Eggplant Puttanesca

(Cold next-day pasta! Still yummy!)

(Cold next-day pasta! Still yummy!)

Inspired by the Spaghetti with No-Cook Puttanesca from Bon Appetit’s Healthyish site (original recipe without my changes is below). Having 2 neighbor friends over for dinner and wanted to do something Italian. I liked the idea of the original recipe, but I wanted some eggplant for more bulk and flavor. Also decided to skip the no-cook and puree the tomatoes for a little bit before adding the cherry tomatoes off heat.

Started by sautéing a little onion for a few minutes, then added the eggplant and cooked until mostly cooked through. Then added the sauce and simmered until eggplant was done. Then off heat add everything else. Served with twirly pasta instead of spaghetti. One of the pastas I brough back from Italy and it was soooo good!

Would most definitely make again! It was even great cold the next day! :)

——————————————————————————————

Spaghetti with No-Cook Puttanesca
From Bon Appetit

Ingredients

  • 2 beefsteak tomatoes (about 1 lb.), halved crosswise, seeds removed

  • 2 garlic cloves, finely grated

  • 1 tsp. crushed red pepper flakes

  • 2 tsp. kosher salt, plus more

  • 1½ cups cherry tomatoes, halved

  • 1 cup Castelvetrano olives, crushed, pits removed

  • 2 Tbsp. drained capers

  • ¼ cup extra-virgin olive oil, plus more for drizzling

  • 12 oz. spaghetti

  • ¼ cup finely chopped parsley

  • 3 Tbsp. unsalted butter, cut into pieces

Directions

Pulse beefsteak tomatoes, garlic, red pepper flakes, and 2 tsp. salt in a food processor until smooth; transfer sauce to a large bowl and mix in cherry tomatoes, olives, capers, and ¼ cup oil.

Cook spaghetti in a large pot of boiling salted water, stirring occasionally, until al dente. Drain pasta, reserving ¼ cup pasta cooking liquid.

Add pasta, parsley, and butter to sauce. Toss vigorously with tongs, adding a splash of pasta cooking liquid or more as needed to create an emulsified sauce that coats pasta. Divide among bowls and drizzle with more oil.

Soft Honey Whole Wheat Sourdough

I had taken a little hiatus from making bread recently, for no particular reason. But then I finally picked up a cookbook on sourdough bread that I’d had my eye on for some time now and I was completely inspired and recharged. Over the past few weeks I have made large pans of crisp and oily focaccia twice, a gooey camembert bread wreath, multiple iterations of thick crusted pizza (which included two separate pizza parties), two loaves of crusty Dutch oven bread, a pan of cinnamon rolls and finally this lovely every so slightly enriched honey whole wheat bread. Phew. I bought a 25 lb bag of flour about a month ago and it’s pretty much gone!

This whole wheat sourdough loaf is lightly sweetened with a little bit of honey, and adds a small amount of whole wheat flour for a little nuttiness, as well as a little nutrition. It is risen with 100% sourdough, no commercial yeast at all which means the rise time is longer, but is so easy. You hardly have to do anything other than mix the ingredients together and let them sit for hours. Almost all hands off. That’s my kind of bread.

I chose this bread for the small Christmas morning brunch I made for my parents. We had scrambled eggs, toast with butter and jam, orange juice and coffee. It was perfect! Merry Christmas!

IMG_3564.jpg
 
IMG_3547.jpg
 
IMG_3516.jpg
IMG_3520.jpg
IMG_3523.jpg
IMG_3537.jpg
 
IMG_3527.jpg
 
IMG_3565.jpg
IMG_3566.jpg
 
IMG_3567.jpg
IMG_3570.jpg
IMG_3577.jpg
 

Soft Honey Whole Wheat Sourdough
Adapted from Artisan Sourdough Made Simple by Emilie Raffa
Ingredients

  • 150 grams (3/4 cup) bubbly, active starter

  • 270 grams (1 cup plus 2 tablespoons) warm milk

  • 30 grams (2 tablespoons) warm water

  • 40 grams (2 tablespoons) honey

  • 30 grams (2 tablespoons) oil

  • 120 grams (1 cup) whole wheat flour

  • 360 grams (3 cups) bread flour - or all purpose in a pinch

  • 1 1/2 teaspoons fine sea salt

  • 14 grams (1 tablespoon) butter, melted

Directions
Make the Dough: In a large bowl, whisk the starter, milk, water, honey and oil together. Add the flours and salt. Mix to combine until a rough dough forms. Cover and let rest for 45 minutes to 1 hour. After the dough has rested, gently work it into a semi-smooth ball, about 15 to 20 seconds. The dough will feel supple and smooth when it comes together.

Bulk Rise: Cover the bowl with a damp towel and let rise at room temperature until double in size, about 6 to 8 hours. The dough will look nice and domed when ready.

Shape: Remove the dough onto a lightly floured work surface. Gently dimple the surface with your fingertips to release any large air bubbles. Roll the dough into a log, tucking the ends underneath. Let rest for 5 to 10 minutes. Meanwhile, lightly coat a 9x5 inch loaf pan with oil. With floured hands, cup the dough and pull toward you to tighten its shape. Place into your loaf pan, seam side down.

Second Rise: Cover the dough and let rest until it has risen about 1 inch above the rim of the pan, about 1 1/2 to 2 hours, depending on temperature.

Preheat your oven to 375 degrees.

Bake: Bake the dough on the center rack for 40 to 45 minutes. When finished, remove the loaf from the oven and brush the crust with the melted butter. Cool in the pan for 10 minutes, then transfer the loaf to a wire rack to cool completely before slicing.

Bakery-Style Scones

We go through a lot of half-and-half at home between my sister and I. We each have a minimum of a morning cup of coffee every day during the week, and very often more whenever we can make it work, each with a little dollop of half-and-half because that’s the only way to drink it in my opinion. There are no boundaries on the weekend. In other words, we also go through a lot of coffee too.

Recently, when I walked to the neighborhood grocery store to pick up a pint of half-and-half they were out of my brand, at least in the pint size. But they did have the quart, so why not? Well, we did a good job working our way through that container, but as 3 weeks were quickly approaching I decided something had to be done to use up what was left. After thinking for a bit, I decided on scones because, well, scones. :) If you’re in the same predicament as I was, give this recipe a try, they’re delish!

IMG_3502.jpg

I made this recipe twice. The first time I made a 1.5x batch to get a really nice sized scone. They turned out beautifully, but unfortunately they were too salty. Since they just have a little sugar in them, as scones should, the salt was overpowering. Still completely edible with a nice spoonful of homemade jam, but certainly not top notch. I made them again with half the salt and a smidge more sugar and enjoyed them much more. The original recipe also calls for 2 tablespoons of milk and 4 tablespoons of cream. I just replaced all of the liquid with the half-and-half and it worked great. Perfect way to use up that last little bit of the carton!

 
IMG_3506.jpg
IMG_3503.jpg
 

Bakery-Style Scones
Adapted from Serious Eats
Ingredients

  • 9 ounces all-purpose flour (about 2 cups, spooned; 255g), plus more for dusting

  • 1 tablespoon baking powder

  • 2 teaspoons sugar

  • 1/2 teaspoon kosher salt

  • 2 ounces cold unsalted butter (4 tablespoons; 55g), cut into 1/2-inch cubes

  • 6 ounces roughly chopped milk chocolate (1 cup; 170g)

  • 6-8 ounces half-and-half (or a mix of milk [2 ounces] and heavy cream [4 ounces])

  • ~1 cup mixed nuts and dried fruit (I used almonds, pecans, cranberries and cherries)

Directions
Adjust oven rack to lower-middle position and preheat to 400°F (204°C). Sift flour into a medium bowl, then whisk in baking powder, sugar, and salt. Add butter and use a pastry blender, or two forks, to work the butter into the flour until it resembles a coarse meal. Add nuts and dried fruit and toss to combine, then stir in the 1/2 and 1/2 to form a soft (but not wet) dough.

Turn dough out onto a lightly floured surface and pat into a 7-inch round. Cut into 6 or 8 wedges with a chef’s knife or a bench scraper. Sprinkle generously with coarse sugar, and arrange on a parchment-lined half sheet pan. Bake until puffed and golden, 25-30 minutes. Serve warm with clotted cream, jam, or a spoonful of whipped cream.

Scones are best eaten the day they are made. They do freeze well however if you have leftovers. When ready to eat, thaw to room temperatures. Reheat in a preheated 425 degree oven for 4-6 minutes until heated through and crisp, but before they start to bake through again and dry out.

Braided Challah Ring

Is homemade bread ever a bad idea? I don’t think so! Judging from the success of this lovely braided challah that I recently brought to a potluck, I don’t think most other people think it’s a bad idea either! This is a quick and simple homemade bread. If you’ve never thought to bring fresh bread to a potluck, trust me, it’ll go over well. Especially if you bring a little jam and/or butter to go with it. Something different, and impressive, especially if you decide to go for the braided ring like I did here. You can just do a simple braid and leave it in a loaf shape if you prefer, but it’s fun to try something different. Any jam will go well with this rich and eggy bread. Trust me, you won’t be disappointed!

43913885_724297907949307_7234707295875747461_n.jpg

Braided Challah Ring
Adapted from King Arthur Flour
Ingredients
Quick Starter

  • 1 cup (120 grams) All-Purpose Flour

  • 1 cup (227 grams) lukewarm water

  • 2 teaspoons instant yeast

Dough

  • All of the starter

  • 3 1/2 cups (420 grams) All-Purpose Flour

  • 1 3/4 teaspoons salt

  • 1/4 cup (50 grams) sugar

  • 1/4 cup (50 grams) vegetable oil

  • 2 large eggs + 1 yolk (save 1 egg white for the glaze, below)

Glaze

  • 1 egg white, saved from above

  • 1 teaspoon sugar

  • 1 tablespoon water

Instructions
To make the starter: Mix the 1 cup flour, 1 cup water and yeast together in a large bowl or the bucket of a bread machine. Let the mixture sit for about 45 minutes. See "tips," below, for instructions using SAF Gold yeast.

To make the dough: Add the dough ingredients to the starter and mix and knead together — by hand, mixer or bread machine — until a smooth, supple dough is formed. This dough is a pleasure to work with; smooth and silky, it almost feels like you're rubbing your hands with lotion.

Place the dough in a greased bowl, turning it over once to coat it lightly with oil. Cover it and let it rise for 1 1/2 hours, or until it's not quite doubled in size.

To shape the dough: Turn the dough out onto a lightly floured surface and fold it over once or twice, to expel the carbon dioxide. Divide the dough into four pieces, and roll each into a snake about 18" long.

On the lightly greased or parchment-lined baking sheet, braid a four-strand braid (see instructions at King Arthur Flour) or fashion a simpler three-strand braid. Form the braid into a circle, pinching the two ends together.

In a small bowl, make the glaze by mixing together the reserved egg white, sugar, and water. Brush the loaf, reserving some for a second application.

Cover the loaf with lightly greased plastic wrap and allow it to rise for 45 minutes to 1 hour, or until it's almost doubled in size. Towards the end of the rising time, preheat the oven to 375°F.

To bake the loaf: Brush the loaf with the remaining glaze (this will give the finished loaf a beautiful, shiny crust, as well as provide "glue" for the seeds), sprinkle with poppy seeds, if desired, and bake for 35 to 40 minutes, or until the challah is golden brown, slightly firm to the touch, and the internal temperature is 195°F.

Remove the bread from the oven, and cool completely before slicing.

Pumpkin Bundt Cake

I have fallen off the posting train! But I’m trying to get back on board. It’s been a busy and fun fall, which means I have neglected this little hobby of mine. But this cake was too good not to share! I had a fun Oktober fest at a new friends house. It was outdoors on the perfect chilly, but lovely October night. They had grilled up two whole lambs, and brewed some homemade beer, and then invited a bunch of people over to share.

I decided to try out a new cake recipe. It’s pumpkin season and this cake did not disappoint. It has a mix of butter and oil for flavor and moisture with the perfect amount of fall spices. It baked up beautifully and came out of the pan easily. I topped with a simple yogurt glaze which had just enough tang to perfectly compliment the rich and sweet cake. Happy Fall!

IMG_3306.jpg

The original recipe had a cream cheese glaze. I didn’t have any cream cheese so I ended up making something up on my own. I didn’t measure anything so I can’t tell you exactly, but I used melted butter, milk, powdered sugar and plain Greek yogurt. I turned out great, but if you’re looking for exact measurements, follow the link to the original recipe and try hers out, I’m sure it’s great!

 
IMG_3303.jpg
IMG_3301.jpg
IMG_3300.jpg
IMG_3297.jpg
 

Pumpkin Bundt Cake
From Style Sweet CA
Ingredients

  • 3 cups all-purpose flour

  • 2 teaspoons baking powder

  • 1 teaspoon baking soda

  • 1 teaspoon salt

  • 2 teaspoons cinnamon

  • 1 teaspoon cardamom

  • 1 teaspoon ginger

  • ¼ teaspoon clove

  • pinch black pepper

  • ¾ cup Land O Lakes® European Style Unsalted Butter, softened

  • 1 cup brown sugar

  • 1 cup white sugar

  • ¼ cup flavorless oil, like grapeseed or canola

  • 3 large eggs

  • 2 teaspoons pure vanilla extract

  • 1/3 cup buttermilk

  • 14 ounces pumpkin puree

Directions
Pre-heat oven to 350°F. Generously brush the inside of a Bundt pan with very soft butter, sprinkle with flour, and tap out the excess. Set aside.

Sift together the flour, baking powder, baking soda, salt, and spices. Set aside.

In the bowl of an electric mixer, beat the butter on medium-low speed with the paddle attachment until smooth. Add in both sugars and mix on medium until light and fluffy, 3 to 5 minutes. Add the oil and vanilla. Mix until combined.

With the mixer on low, add in the eggs, one at a time. Stop the mixer and scrape down the sides and bottom of the bowl.

With the mixer on low, add in half of the flour mixture and mix until just combined. Add in the buttermilk and mix until combined. Add in the remaining half of the flour mixture and mix until just incorporated and few streaks of flour remain visible. Add in the pumpkin puree and mix until smooth. The batter will be thick.

Spoon the cake batter into the prepared pan. Tap the bottom of the filled pan on a hard work surface to release any air bubbles. Bake for 45 to 55 minutes, or until a long wooden skewer or thin paring knife inserted into the center of the cake comes out clean. Cool on a wire rack for about 15 minutes. Gently loosen the edges of the cake with a flexible rubber spatula. Place a wire rack or cutting board on top of the cake. Holding on to the edges of the pan and rack, carefully invert everything. Remove the cake pan and continue to completely cool the cake before adding the glaze.

Everyday Oatmeal Cookies

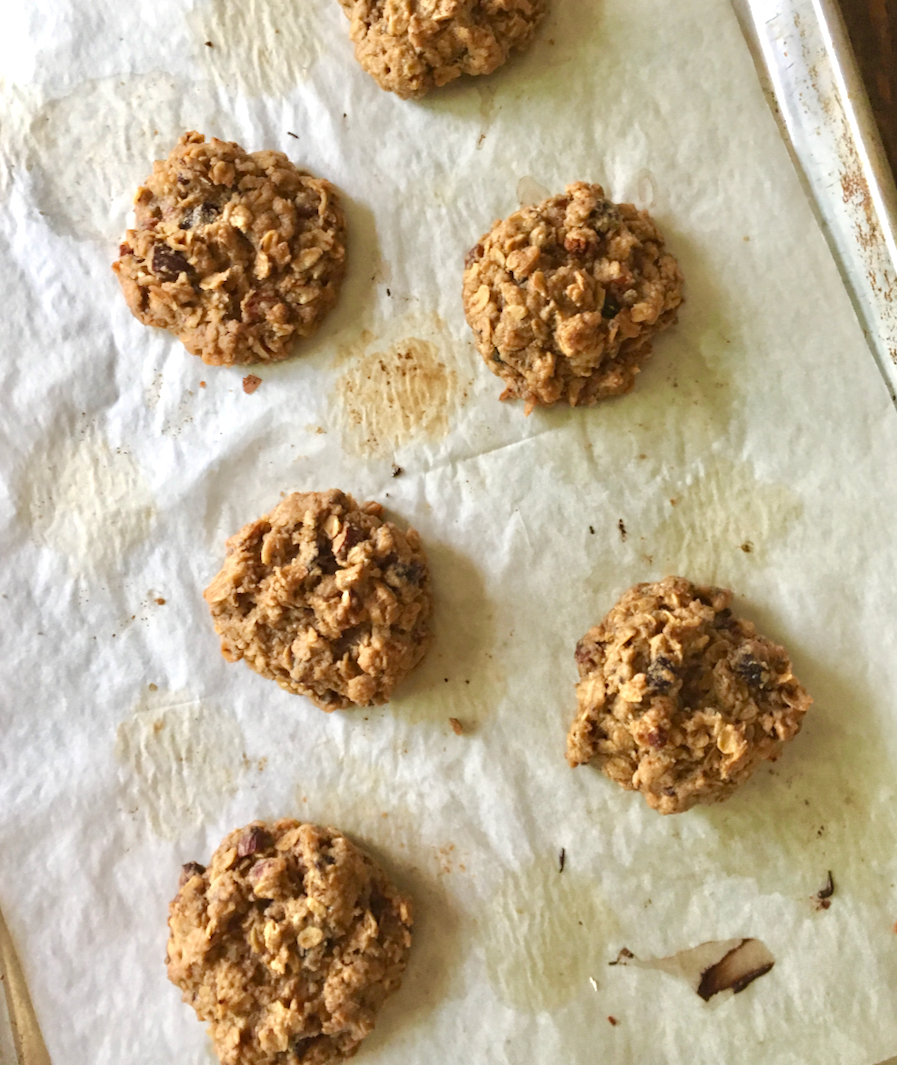
Looking for a classic? I’ve got the perfect thing for you. If you’re looking for a classic oatmeal cookie that is. This cookie was just what I was looking for last week. I wanted something simple, hearty, and delicious. Special enough for dessert, but also the perfect afternoon snack with a glass of milk or a cup of coffee. This cookie fit the bill perfectly. Toasted oats, butter, and cinnamon mixed with a handful of chopped nuts and dried fruit. So good. I promise, it is so good.

IMG_3130.jpg

I made a few small changes to the original recipe. I cut back just a smidge on the sugar, from 2/3 cup to 1/2 cup. I didn’t miss it at all. I also toasted the oats at 350 for about 15 minutes prior to mixing. This helped really bring out a nice toasted oat flavor, and a little extra crunch to the final cookie. You could skip this step, but I highly recommend it and it isn’t very difficult at all. You can just toast the oats up on the same cookie sheet that you plan on baking the cookies on. You don’t even have to wash another pan!

Finally, I used a mix of dried cranberries, almonds and pecans as add ins for this cookie and it was delicious. But you can use any combination of nuts, seeds, fruits and chocolate. Any of these options are sure to be good. Enjoy!

 
IMG_3119.jpg
IMG_3131.jpg
 

Everyday Oatmeal Cookies
Adapted from Joy the Baker
Ingredients

  • 1 1/2 cups (120 grams) old-fashioned rolled oats

  • 1/2 cup (1 stick) butter, softened

  • 1/2 cup (100 grams) brown sugar

  • 1 large egg

  • 1 teaspoon pure vanilla extract

  • 3/4 cup (90 grams) all-purpose flour, or a mix of half all-purpose and half whole wheat flour

  • 1/2 teaspoon baking soda

  • 3/4 teaspoon ground cinnamon

  • 1/2 teaspoon sea salt

  • 2 - 2 1/2 cups of your favorite add ins (nuts, seeds, dried fruit, chocolate, coconut, etc)

Directions
Preheat the oven to 350 degrees. Spread the oats on a baking sheet and toast for about 15 minutes, stirring every 5 minutes, until starting to turn golden brown and a nice toasty smell is coming from your oven. Watch the oats carefully to ensure they do not get too dark. Remove from the oven and let cool for a few minutes while you put the rest of the ingredients together.

In a large bowl, combine softened butter and brown sugar. Beat together using an electric hand beater until slightly more pale and fluffy. This will take about 3 to 5 minutes. Add egg and beat until thoroughly combined. Add the vanilla extract and beat until blended.

In a small bowl whisk together flour baking soda, spices, and salt. Add the flour mixture to the butter and egg mixture slowly beating on low speed until just incorporated. Stir in the oats, and whatever add-ins you’ve decided on.

Using a cookie scoop, portion out cookies on baking sheet that has been lined with parchment paper. Bake cookies for 12 to 15 minutes or until they’ve reached your desired doneness. Allow to cool on the cookie sheet for 5 minutes before transferring to a wire rack to cool completely. 

Yields: 12 cookies
Approximate nutrition: 190 calories (without add-ins)

Peach Yogurt Cake

August is now officially over, which means peach season is going to be winding down soon. Excuse me while I shed a tear or two. While I try to eat most things only when in season, there are times when I bend this rule. However, with peaches I am very strict. I will not buy peaches at any other time of year except in late summer. There is nothing as disappointing as biting into a beautiful golden peach and hearing a crunch, and find yourself looking at a dry, hard and very sad piece of fruit. Peaches just don't do well at all out of season. 

To celebrate these golden beauties for a little longer, Lara whipped together a light and delicious peach cake to bring to a friends house this weekend. We enjoyed it after feasting on grilled pizzas, hot and bubbly right off the grill. It was the perfect way to end a late summer Saturday night. 

IMG_3090.jpg

The original recipe called for figs instead of peaches, and then had you swirling mascarpone and jam into the batter before baking. This sounds absolutely divine, but unfortunately I had neither, and was not making another trip to the store so I ended up with a simpler version of the cake with only some chopped peaches. It was still absolutely wonderful, but if you're looking for something with just a bit more pizazz, I would definitely give the mascarpone and jam a try!

This cake baked up nice and tall, and had a lovely tender crumb. Nice and moist, and really not super sweet at all which I really like. It would be fantastic with some lightly whipped cream, or vanilla ice cream! Next time!

 
IMG_3095.jpg
 

Peach Yogurt Cake
Adapted from Joy the Baker
Ingredients

  • 2 1/2 cups all-purpose flour
  • 2 teaspoons baking powder
  • 1/2 teaspoon baking soda
  • 1/2 teaspoon salt
  • 1/2 cup granulated sugar
  • 1/4 cup unsalted butter, melted and slightly cooled
  • 2 large eggs
  • 1 1/2 cups buttermilk
  • 1 teaspoon pure vanilla extract or 1/4 teaspoon pure almond extract
  • 2 peaches, chopped

Directions
Place a rack in the center of the oven and heat oven to 350 degrees F. Butter an 8-inch wide and 3-inch tall cake pan and lightly dust with flour.

In a medium bowl, whisk together flour, baking powder, baking soda, and salt. Set aside.
In a small bowl, whisk together sugar, butter, eggs, and buttermilk. Whisk in the vanilla or almond extract.

Add the buttermilk mixture all at once to the dry ingredients. Stir until just combined and no lumps remain. Spoon batter into the prepared pan.

Bake for 35-40 minutes, or until a skewer inserted in the center of the cake comes out clean. Allow cake to cool to room temperature before slicing to serve. Serve plain or with sweetened whipped cream.

Chocolate Hazelnut Zucchini Bread

I try to make at least one zucchini bread every zucchini season. What usually ends up happening is I buy what I think is a lot of zucchini expecting to use some of it for a zucchini bread, but then I get busy and by the end of the week I've eaten all the zucchini and have none left to bake with! This week I decided that it was time to ensure that I got to the zucchini for baking before it was all eaten up. I found a recipe for zucchini bread with walnut oil. I didn't have any walnut oil, but I did have some hazelnut oil leftover from a recipe that I need to use and so this was perfect choice. With some added chopped hazelnuts and dark chocolate chunks studding the batter, this was the a wonderful breakfast treat for the week, and something I would make over and over again. 

IMG_3072.jpg

The recipe is simple, and I made just a few changes to suit my needs. I cut the sugar in half because I prefer my morning treats be less sweet, and then I replaced half of the oil with yogurt to lighten it up, a bit but still maintain moisture and flavor. It baked up beautifully and full of flavor. The hazelnut oil scented the batter just enough, and the addition of chopped hazelnuts really helped this flavor shine. I ended up baking it for only about 40 minutes, as opposed to the 55 minutes originally called for, and was happy with that. Overall a perfect breakfast treat for zucchini season!

IMG_3053.jpg
IMG_3064.jpg
IMG_3071.jpg

Chocolate Hazelnut Zucchini Bread
Adapted from Dishing Up the Dirt
Ingredients

  • 1/4 cup (50 grams) hazelnut oil
  • 1/4 cup (60 grams) plain Greek yogurt
  • 1/4 cup (84 grams) honey
  • 2 eggs, lightly beaten
  • 1 teaspoon pure vanilla extract
  • 1 1/2 cups (160 grams) coarsely grated zucchini - about 1 medium-sized zucchini
  • 3/4 cup (90 grams) all purpose flour
  • 3/4 cup (90 grams) whole wheat flour
  • 1/2 teaspoon baking powder
  • 1/2 teaspoon baking soda
  • 1/2 teaspoon salt
  • 1/4 cup dark chocolate chips
  • 1/4 cup coarsly chopped ha
  • Turbinado sugar, for topping (optional)

Directions
Place an oven rack in the middle position of your oven and pre-heat the oven to 350F. In a large bowl, beat together the oil and honey. Stir in the eggs, vanilla and zucchini. Mix until well combined.

In a separate bowl, whisk together the flours, baking powder, baking soda, and salt. Stir the dry ingredients into the wet ingredients (being careful to not over-mix) and add the chocolate chips. and hazelnuts. 

Pour the batter into a lightly greased 8 1/2-by-4 1/2-inch loaf pan. Sprinkle the top of the loaf with the turbinado sugar. Bake until a toothpick inserted in the center of the bread comes out clean, 35-40 minutes. Cool the zucchini bread in the pan for about 15 minutes, then transfer it to a wire rack to cool completely.

Yield: 10 slices
Approximate Nutrition: 223 calories/slice