Lentil Burgers

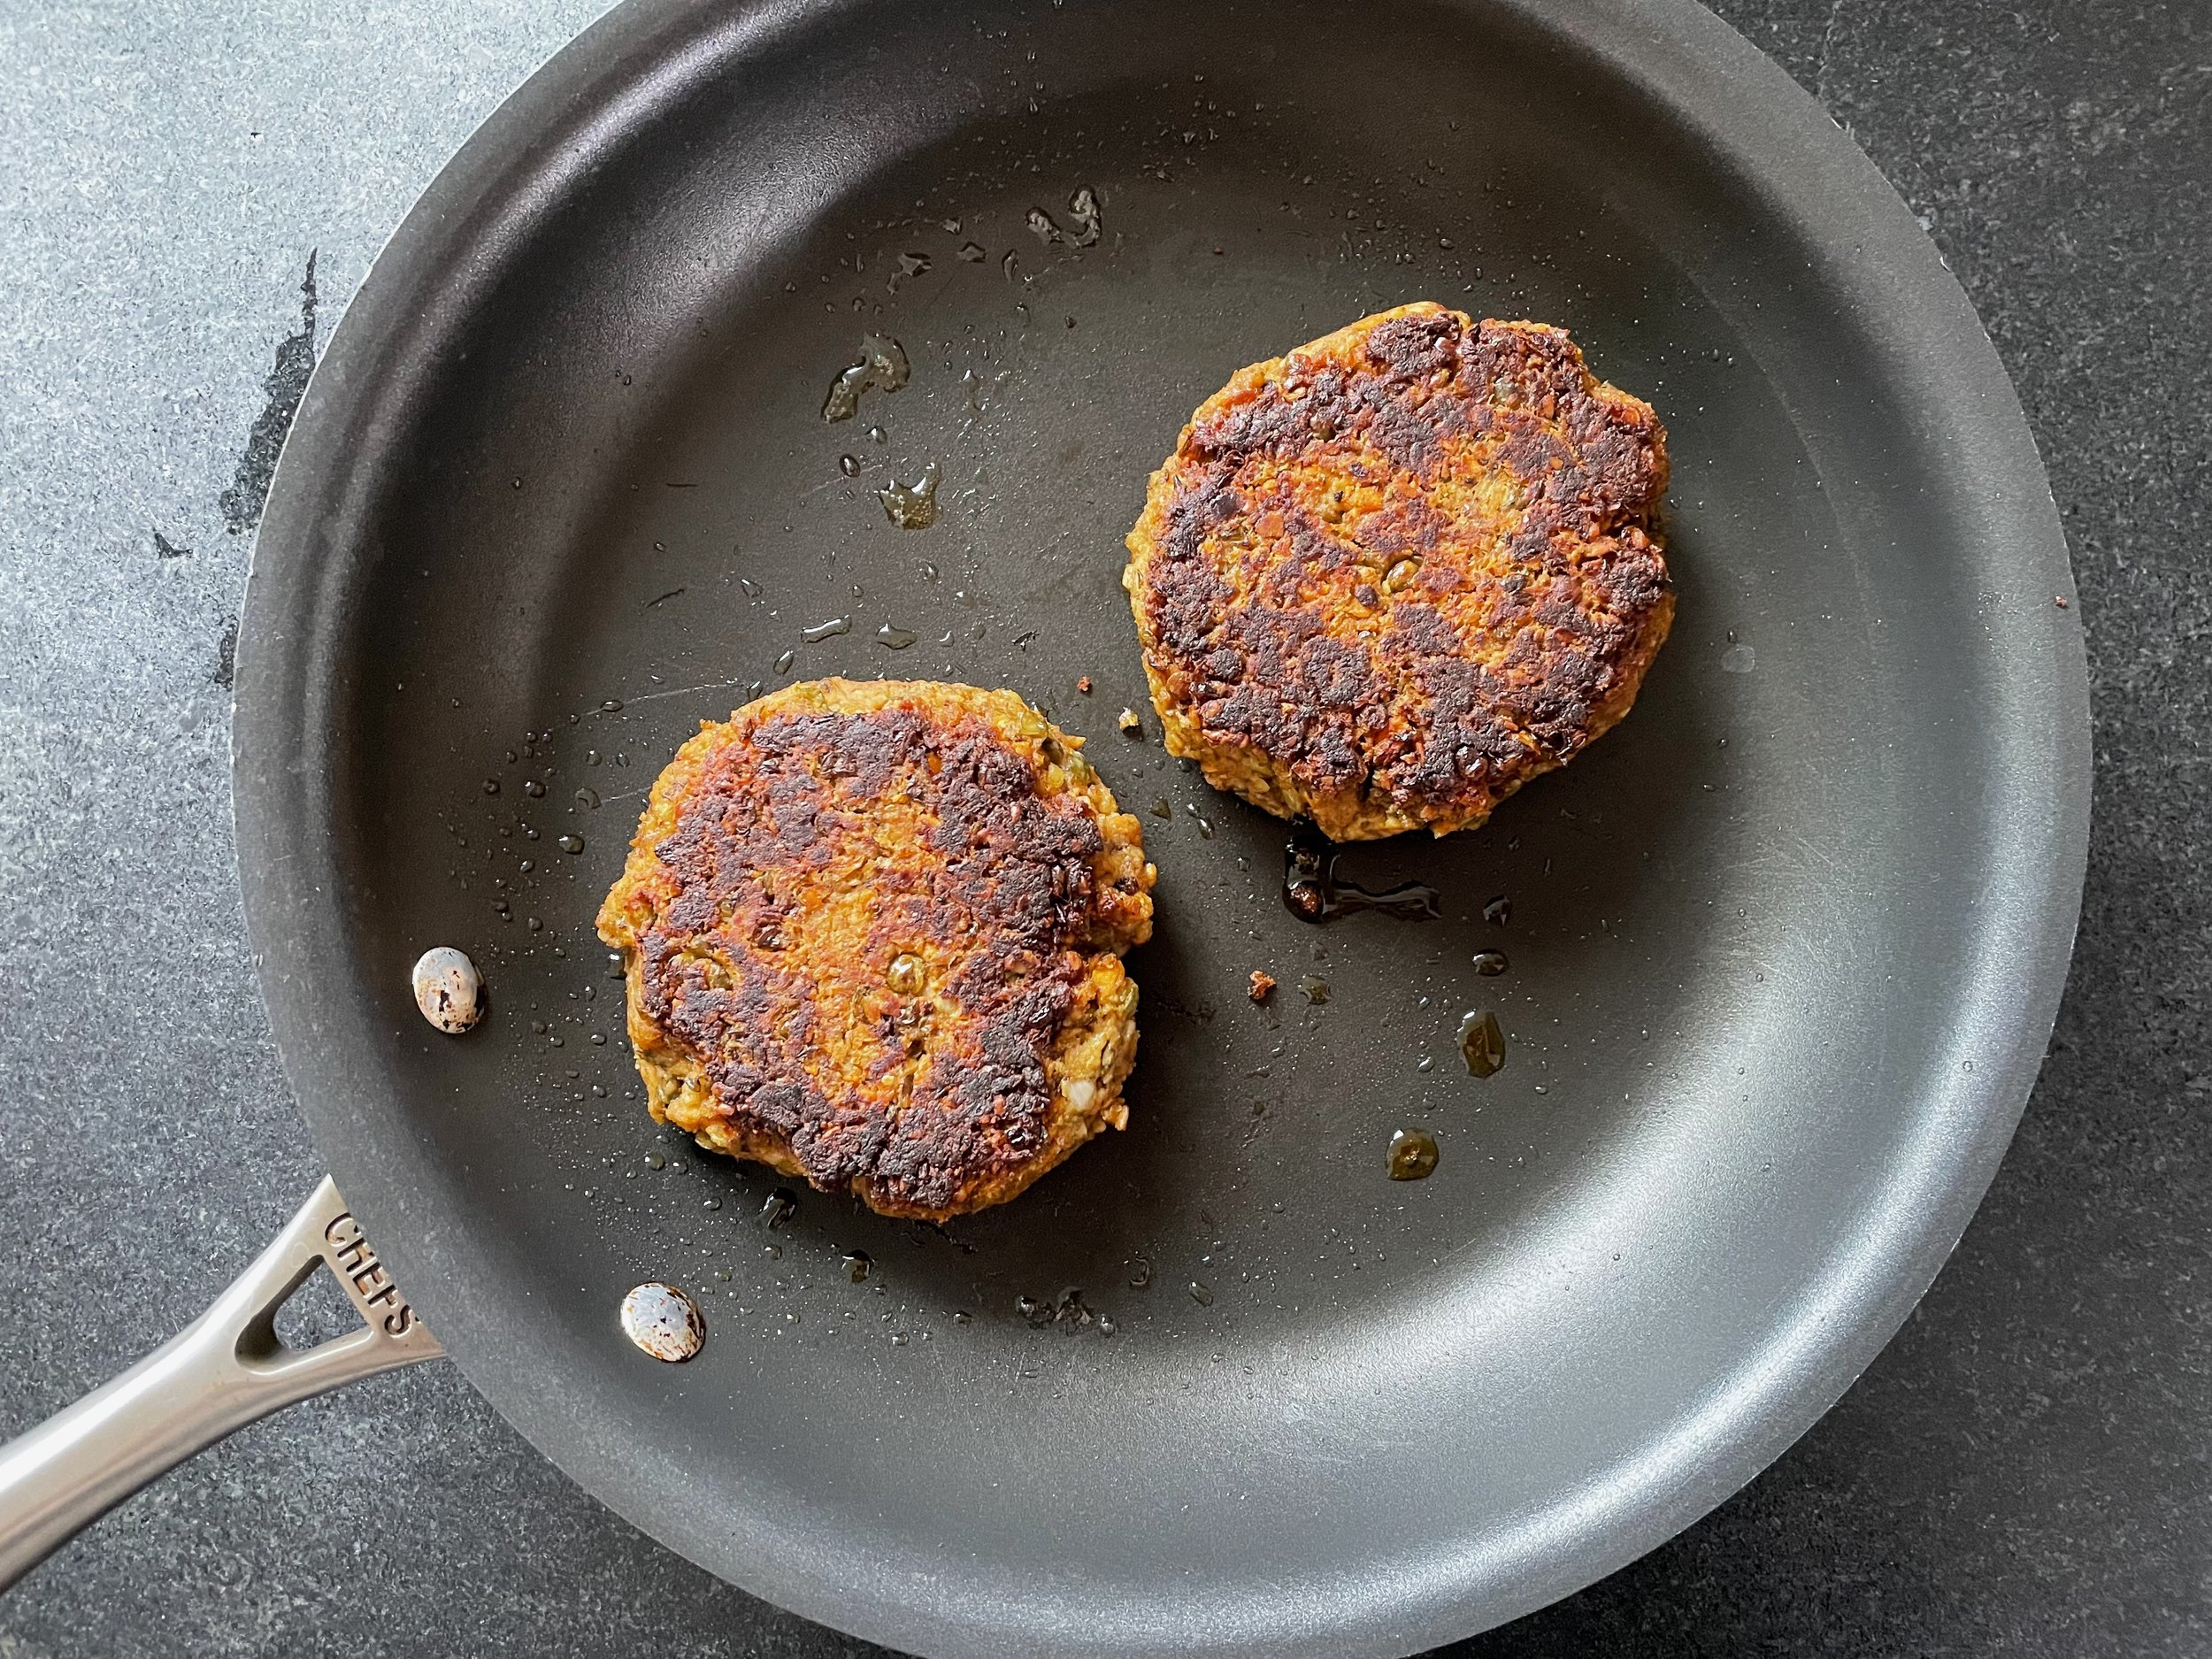
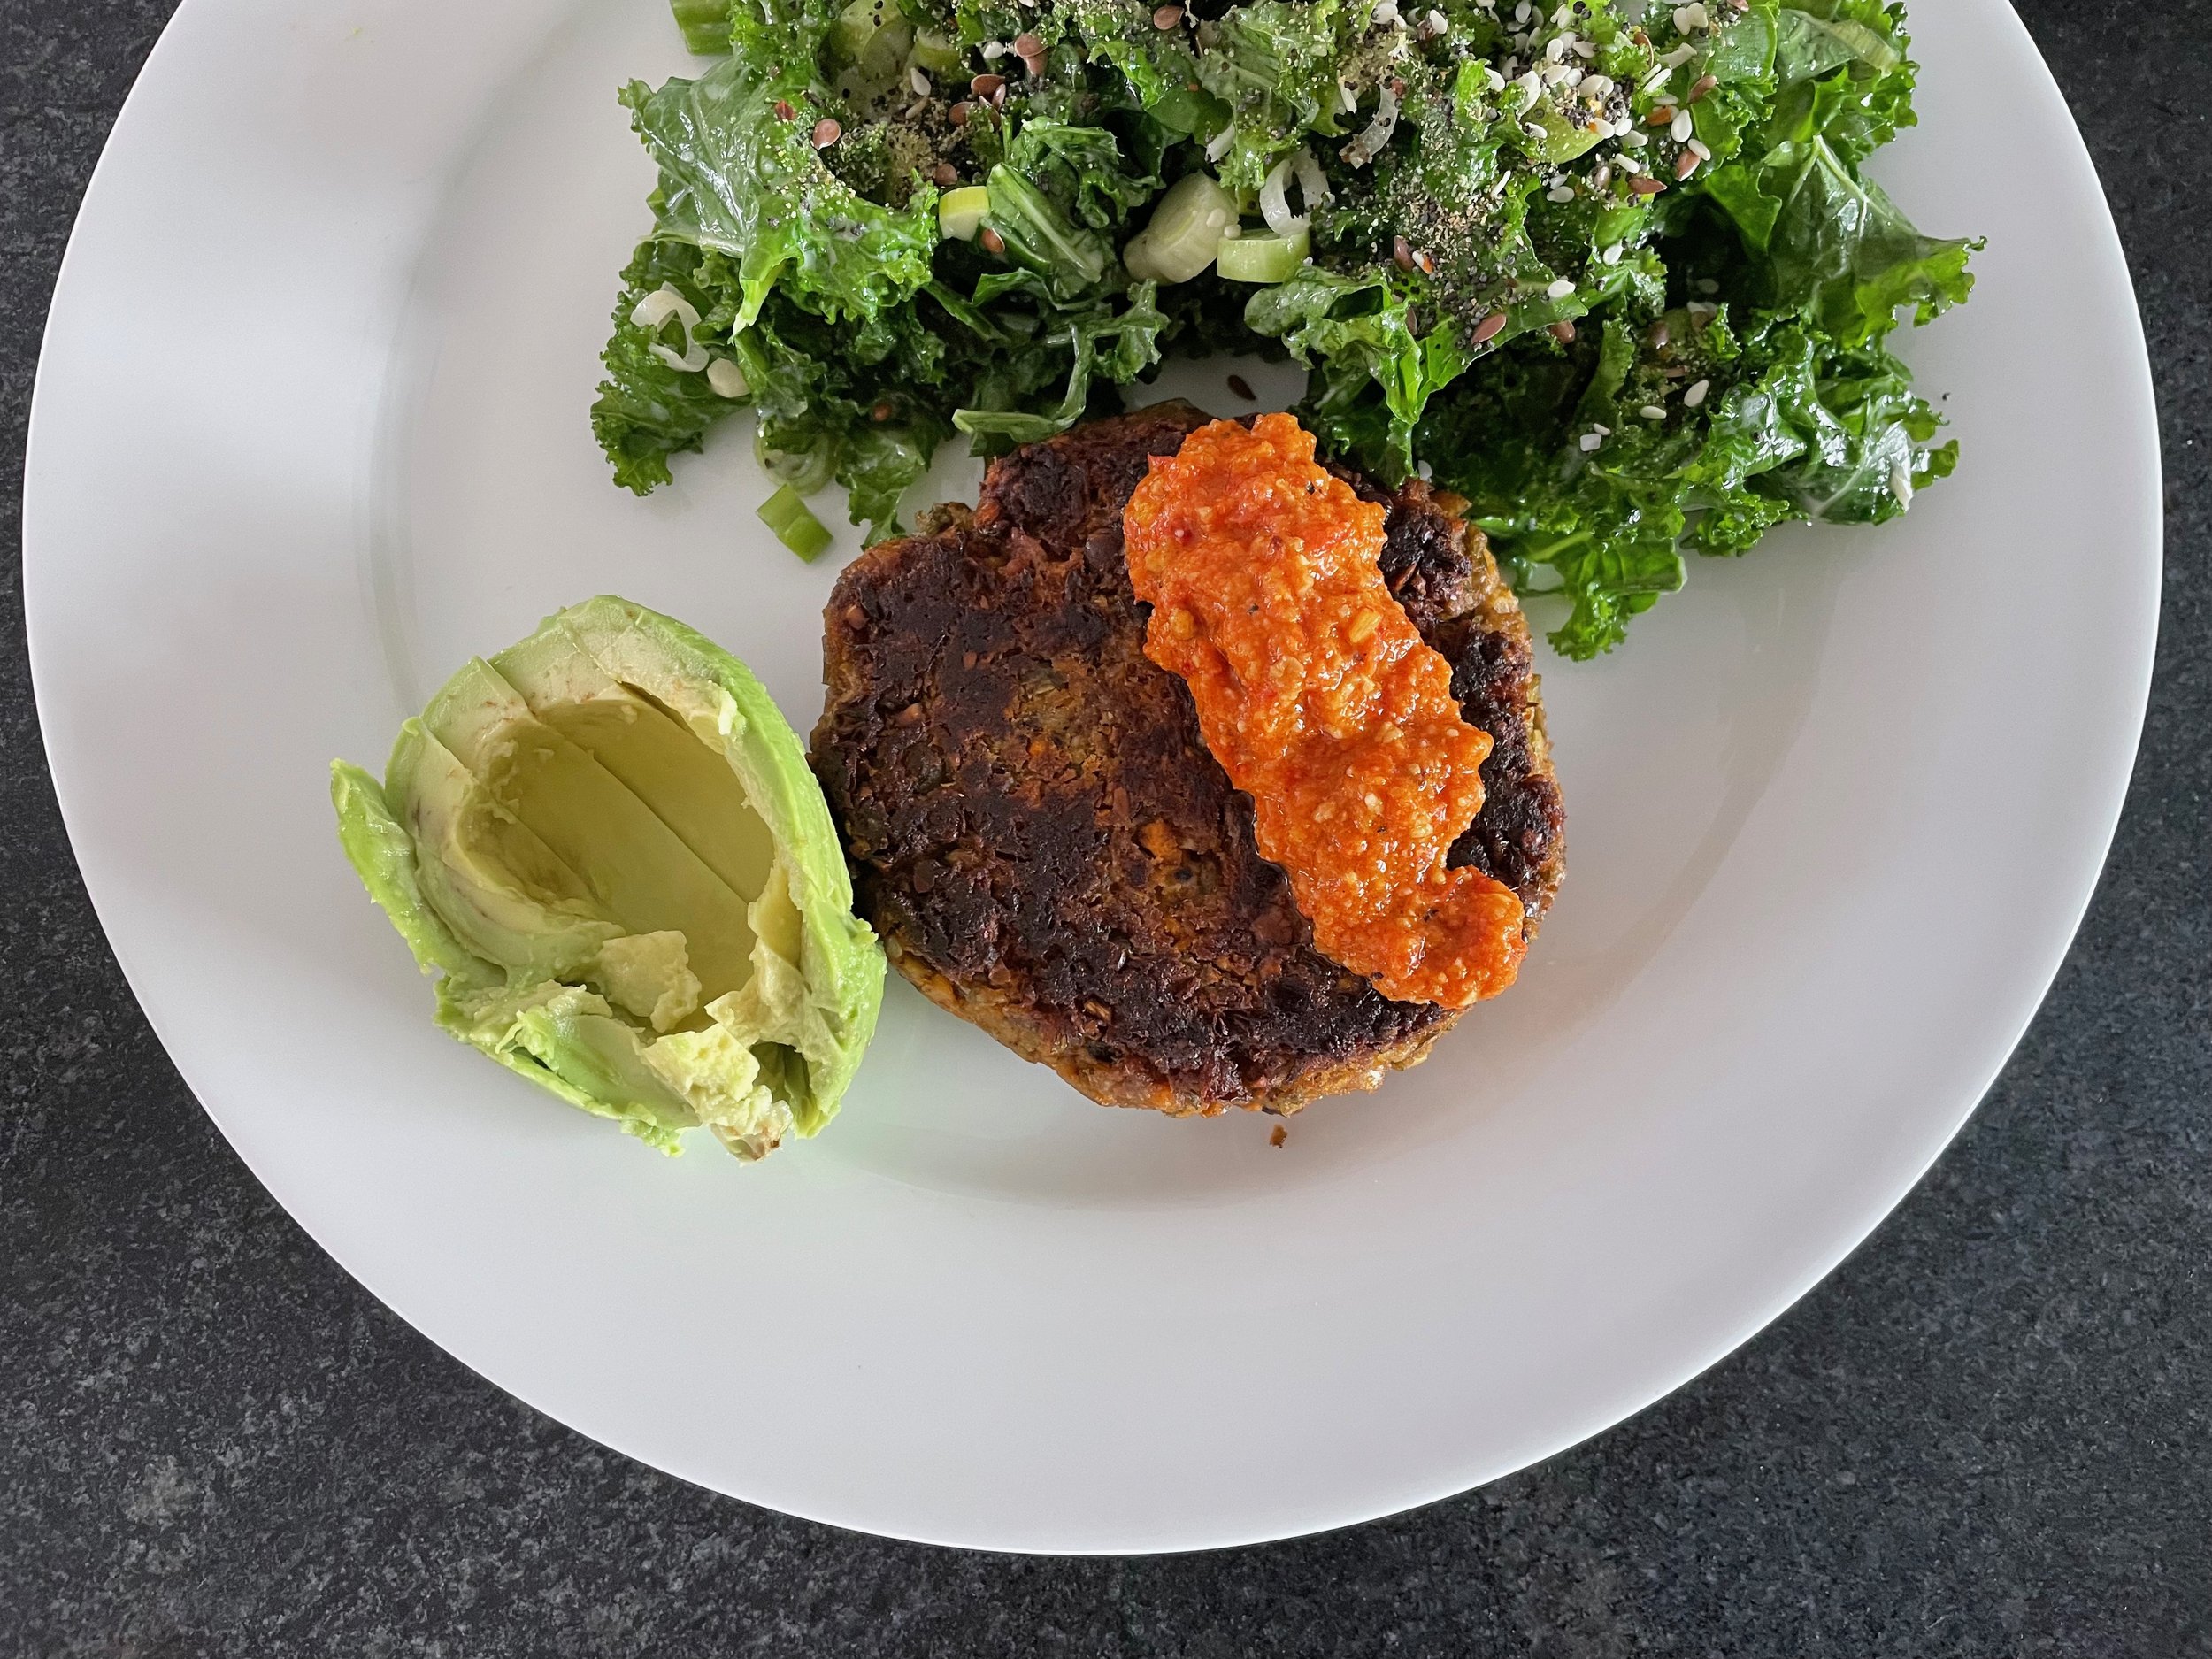
These burgers were great! I overcooked some lentils so decided to make them into a veggie burger. This recipe has everything that I keep on hand. It took a little time to put together but not at all difficult. Good flavor. Good texture. Pan-fried well, didn’t fall apart. Could add any flavorings you wanted.

While I pan-fried the first two, the remaining six I baked. Easier this way. Baked them for 40 minutes at 375 degrees.

Lentil Burgers
From Making Thyme for Health
Ingredients

  • 2 ½ cups cooked green lentils [about 335 grams cooked, this is very approximately 145 grams raw/dried]

  • 1 cup carrots, finely chopped [I used 2 med/large carrots, 197 grams]

  • 1 cup onion, finely chopped [I used 3/4 medium onion, 130 grams]

  • 3 cloves garlic, minced

  • 1/2 cup (40 grams) walnuts

  • 1/2 cup (55 grams) sunflower seeds

  • 1/2 cup flour, I used chickpea flour

  • 1 cup breadcrumbs [I used two small/med pieces of bread that I toasted, about 85 grams toasted]

  • 2 eggs

  • 2 tablespoons (30 grams) tomato paste

  • 2 tablespoons (30 grams) Worcestershire

  • 1 tablespoon fresh or dried thyme [I omitted]

  • 1 tablespoon fresh or dried oregano [I omitted]

  • 1 teaspoon fine sea salt

Directions
Using a food processor, finely chop the onion, carrots, garlic, walnuts and sunflower seeds then transfer to a large bowl. I process each ingredient individually to achieve the best texture.

Next add half of the cooked lentils to the food processor and pulse until they appear slightly mashed, then transfer them to the bowl along with the remaining lentils.

Once you have all of the vegetables, lentils, nuts and seeds in the bowl, add the breadcrumbs, herbs, and salt.

In a small bowl, combine the beaten egg with the tomato paste and the Worcestershire. Pour the egg mixture into the bowl with vegetables and lentils and stir everything together. Sprinkle in the flour a little at a time as you continue to stir. If the mixture seems too wet, add more flour as needed. If you have time, refrigerating the mixture for about 30 minutes also helps dry out some of the moisture.

Form eight individual patties with your hands, making sure to keep them somewhat flat with rounded edges. They will hold together better if they aren’t too big or thick. At this point you can refrigerate them until you are ready to cook (for up to 2-3 days) or cook them right away.

When you’re ready to cook them, start by warming the olive oil over medium-heat in a skillet for at least five minutes. Once the skillet is thoroughly heated, cook the burgers on each side for about 5-6 minutes. I like the push the edges of the burger to the side of the pan as I cook them to make sure they are cooked on the sides as well. Serve on a warm bun with desired toppings and dig in!

Approximate Nutrition (for 1 burger, 1/8 of the recipe): 247 calories, 9 g fat, 30 grams carbs (8 g fiber, 5 grams sugars), 12 g protein

Stuffed Pork Loin with Chimichurri

IMG_0783.jpeg

Last Saturday Lara and I hosted a small Christmas gathering with our friend Lindsay and her husband Andrew. They both enjoy good food and trying new things so we were excited to try a new recipe, something fun we’ve never done before.

We thought that a stuffed pork loin sounded festive, fun, and celebratory. Something we won’t typically cook for ourselves, and sadly something our family just won’t enjoy that much so not something to make for them. I’m very thankful for friends who are excited about trying new things, because my family (however much I love them) isn’t.

We did some recipe hunting and settled on this recipe for an Argentinian style pork roast stuffed with olives, roasted red peppers, Chimicurri and other tasty things - a combination of things I would never think about putting together which is why I was excited to try it.

IMG_0792.jpeg

This was good to get me out of my typical routine (which for the last few months has been FULL of fresh lemon, parmesan, and garlic… so good!).

IMG_0800.jpeg
IMG_0758.jpeg

This recipe definitely had a lot of steps, but wasn’t difficult. Getting your mise en place done ahead of time is extremely helpful so I recommend prepping everything before starting to put the roast together. Make your chimichurri (or buy a good store bought version if that’s more your style, no shame in that if that’s what works for you). Get your spice mixture together, and then lay everything else out so it’s at hand and ready to go; your olives, peppers, capicola, breadcrumbs, and eggs (if using).

I made the chimichuri in the recipe below with a slight variation. I didn’t have any fresh oregano but could get fresh cilantro and parsley from the farmers market so I used that combination. I also made 2/3 of the recipe as printed and there was still plenty of it.

IMG_0723.jpeg

I do think a really good cut of pork is critical to the best final product. I bought a gorgeous 3.3 lb (I went slightly smaller than the recipe called for without any issues) center cut pork loin from my favorite butcher (Louise Earl Butcher for those in Grand Rapids, Matt is the best!). This roast was gorgeous! It had a beautifully thick cap of fat which roasted up so tasty. The recipe says to not trim this fat cap, but I did end up trimming a little from mine because it was so thick to start. It did not detract from the finished roast, there was still an ample amount of fat.

The most challenging/technical part of the recipe was cutting the roast open so that I could stuff it. I watched a video which helped. It’s important to have a good sharp knife, and to go slow. This was the first time I had done this and it turned out fine.

Once that step was done the rest was pretty easy. Just start layering everything, starting with the spice mixture and chimichuri, then the capicaola that you cover with the festive combination of green olives (I used castelvetrano olives) and roasted red peppers (I roasted my own, but jarred are easy and delicious. I ended up roasting two large red bell peppers and probably used just a little over half of this in the roast).

Roll it up and tie it tightly with butchers twine to keep everything in place. Place the finished product on a wire rack over a baking sheet and into the oven. I think this could all easily be done in advance, the day prior if desired. I don’t see why it would be a problem to refrigerate at this point if you want to make it easy on yourself the day you’ll be serving this.

IMG_0784.jpeg

I ended up baking the roast for a total of 1 hour and 28 minutes (not the 1.5-2 hours as stated in the recipe, but I did have a slightly smaller roast) - it came in at just over 135 degrees, a little over 140 degrees in a few spots, so probably could have come out a minute or two earlier, but I don’t think it was a big deal, it was not overcooked or dry at all. I let it rest about 15-20 minutes before slicing and it was perfect. The nice thing about something like this is that the timing isn’t so so crucial. It can sit and rest anywhere from 15 minutes to an hour, so you have a lot of flexibility.

IMG_9855 2.jpeg

I served the roast with a Celery Root salad with Brown Butter, Oranges, Dates, and Almonds from Joshua McFadden’s Six Seasons (one of my all time favorite cookbooks!), as well as some fresh sourdough bread that I baked earlier that morning. It was a perfect combination.

Final verdict? This was amazing. I couldn’t have picked a better recipe for our party. It was beautiful, smelled amazing while roasting, and was one of the best tasting things I have made all year. I will definitely be making it again. The fat cap was crispy and fatty and basted the entire roast. The filling was perfect, an amazing combination of flavors as well as some texture differences.

Highly recommended for your next party!


Stuffed Pork Loin with Chimichurri
From 177 Milk Street
Ingredients

For the Chimichurri:

  • 3 cups lightly packed fresh flat-leaf parsley

  • 1/3 to 1/2 cup lightly packed fresh oregano

  • 7 medium garlic cloves, smashed and peeled

  • 1 1/2 teaspoons ground cumin

  • 1 1/2 teaspoons ground coriander

  • 3/4 teaspoon red pepper flakes

  • Kosher salt and ground black pepper

  • 1/4 cup red wine vinegar

  • 3/4 cup (6 ounces) extra-virgin olive oil

For the Roast:

  • 1 tablespoon ground cumin

  • 1 tablespoon ground coriander

  • 2 teaspoons packed light brown sugar

  • Kosher salt and ground black pepper

  • 4 -pound boneless center-cut pork loin

  • 6 ounces thinly sliced capicola or mortadella

  • 1/2 cup pitted green olives, roughly chopped

  • 1 1/2 cups drained roasted red peppers, patted dry and torn into large pieces

  • 1/3 cup panko breadcrumbs

  • 3 hard-cooked large eggs, peeled and halved crosswise (optional in my opinion, I did without and it was just fine)

  • 1 1/2 tablespoons extra-virgin olive oil

  • Flaky sea salt, to serve (optional)

Directions
To prepare the Chimichurri: in a food processor, combine the parsley, oregano, garlic, cumin, coriander, pepper flakes, 1 teaspoon salt and ½ teaspoon black pepper. Process until finely chopped, 30 to 45 seconds. Scrape the bowl, add the vinegar and oil, then process until as smooth as possible, 45 to 60 seconds. Measure ¼ cup of the chimichurri into a small bowl and set aside; transfer the remainder to a serving bowl; cover and refrigerate until ready to serve.

Heat the oven to 350°F with a rack in the lower-middle position. Line a rimmed baking sheet with extra-wide foil and a fit with a wire rack.

To prepare the roast: in a small bowl, stir together the cumin, coriander, brown sugar, 3½ teaspoons salt and 1½ teaspoons pepper. Set aside. Heat the oven to 350°F with a rack in the lower-middle position. Line a rimmed baking sheet with extra-wide foil and a fit with a wire rack. To prepare the roast, in a small bowl, stir together the cumin, coriander, brown sugar, 3½ teaspoons salt and 1½ teaspoons pepper. Set aside.

Cut eight 24-inch lengths of kitchen twine. Place the roast fat side down on a cutting board, perpendicular to the counter's edge. With a sharp boning or carving knife, cut along the length of the roast, down its center, stopping about ½ inch from the bottom. Starting at the base of the cut and with the knife blade held as parallel as possible to the cutting board, slice along the length of the roast, unrolling the meat with your free hand as you go. Continue cutting and unrolling the meat until the half is a flat, fairly even surface ½ to ¾ inch thick. Rotate the roast 180° and repeat with the second side. If there are areas that are slightly too thick, use a meat mallet to pound those areas to the same thickness.

Season the pork on both sides with the spice mixture. Place the meat fat side down and with a short side nearest you. Spread the reserved ¼ cup chimichurri evenly on the meat. Shingle on the capicola slices, covering the entire surface, then sprinkle evenly with the olives. Lay the red peppers on top, tearing as needed to cover the entire surface. Sprinkle evenly with the panko. Place the egg halves cut sides down in a row about 3 inches from the bottom edge. Lift the bottom edge over the eggs and continue rolling the meat into a tight cylinder. Position the cylinder seam side down and tie at even intervals with the twine, then snip off excess twine. If any bits of filling fall out, simply tuck them back in. Brush the roast on all sides with the oil.

Transfer the roast fat side up to the prepared baking sheet. Bake until the top is nicely browned and center of the roast reaches 135°F, 1½ to 2 hours. Let rest on the wire rack for 30 to 60 minutes. Remove the chimichurri from the refrigerator about 30 minutes before serving. Cut the roast into ½-inch-thick slices, removing the twine as you go. Arrange the slices on a platter, sprinkle with flaky salt (if using) and serve with chimichurri.

Tip: Don't trim the fat off the pork loin. The fat cap lends richness to an otherwise lean cut and gives the roast an appealing burnished-brown appearance. Don't rush when butterflying the pork loin. Short, small cuts allow for the best control so you can maintain an even slice and adjust as you go. Don't worry if the surface of the butterflied meat is not perfectly flat or even; it won't matter in the finished dish.

Stewed Beans with Shredded Pork and Salsa Fresca

IMG_9843.jpeg

A few weeks back now Lara and I spent the weekend working on this shredded pork and beans recipe. We had bookmarked it (figuratively) months prior and finally got to it, phew! It wasn’t challenging, and doesn’t call for that many ingredients, but there are a fair amount of steps. But it’s super easy to split them up into different days and make the whole thing more manageable.

IMG_9866.jpeg

The description of the recipe calls this “the best beans in the world”. Inspired by traditional stewed beans from Mexico City with optional version enriched with shredded pork (which I opted for!). It all starts with a sofrito of onion, garlic, tomatoes and jalapeños added to tender and fully cooked cranberry beans (recommended instead of the traditional pinto beans as the recipe testers found that the pinto beans available in the U.S. do not cook up with the same plumpness and velvety texture as the ones they tasted in Mexico; cranberry beans were a closer approximation).

They finish the beans with a fresh tomato salsa that I’m sure is a great addition, but I didn’t get around to making. Maybe next time. I topped mine with plain yogurt (or you could use sour cream) and fresh cilantro.

IMG_9861.jpeg

There are two main recipes, one for the beans and one for the pork. The recipe for beans states that the pork is optional. And it certainly could be, but I highly recommend doing both the pork and beans. The pork recipe gives you some delicious pork broth that you can use in the beans so that’s fun, and it was super tasty!

In the end, what this recipe really seemed like was a slightly different take on what I guess you would call an American chili. It was warming and filling. Perfect to eat by the fire on a cool fall night which Lara and I opted to do at the last minute! It was lovely. And our neighbors even brought us over some carrot cake to end the night with a bang! What a lovely surprise!

IMG_9873.jpeg

Stewed Beans
From 177 Milk Street
Ingredients:
For the Beans

  • 1 pound dried cranberry beans

  • kosher salt and ground black pepper

  • 1 tablespoons lard or neutral oil

  • 1 medium white onion, chopped

  • 2 medium garlic cloves, thinly sliced

  • 1 bunch cilantro, stems finely chopped, leaves roughly chopped, reserved separately

  • 1 1/2 quarts chicken broth, pork broth (recipe follows; optional) or water

For the Sofrito

  • 2 tablespoons lard or neutral oil

  • 1 large white onion, chopped

  • kosher salt and ground black pepper

  • 4 medium garlic cloves, minced

  • 2 pounds ripe tomatoes, cored and roughly chopped

  • 2 jalapeño chilies, stemmed, seeded and finely chopped

Directions:
To prepare the beans, in a large bowl, combine the beans with 2 quarts water and 2 tablespoons salt; stir to dissolve salt. Cover and soak the beans overnight at room temperature.

Drain the beans. In a large Dutch oven, heat the oil over medium heat until shimmering. Add the onion and 1 teaspoon salt, then cook, stirring occasionally, until it begins to brown, about 5 minutes. Stir in the garlic and cilantro stems. Cook, stirring, until fragrant, about 30 seconds. Stir in the beans and broth, then bring to a boil over medium-high. Cover, reduce to low and cook, stirring occasionally, until the beans are tender, about 1 hour.

While the beans cook, make the sofrito. In a 12-inch nonstick skillet over medium, heat the lard until shimmering. Add the onion and ½ teaspoon salt, then cook, stirring occasionally, until well browned, 5 to 7 minutes. Stir the garlic and cook until fragrant, about 30 seconds. Add the tomatoes and jalapeños and cook, stirring often, until the tomatoes have broken down, the liquid they released has cooked off and the mixture begins to sizzle, 10 to 15 minutes. Remove from the heat and set aside.

When the beans are done, remove the pot from the heat and let stand uncovered for 30 minutes to allow the liquid to thicken slightly. Return the beans to a simmer over medium, stirring occasionally. Add the sofrito and shredded pork (if using). Cook, stirring occasionally, until heated through, about 5 minutes. Taste and season with salt and pepper, then stir in the cilantro leaves. Serve with salsa fresca on the side.


Shredded Pork
Ingredients:

  • 2 pound boneless pork shoulder, trimmed and cut into 1 1/2-inch cubes

  • 2 jalapeño chilies, stemmed

  • kosher salt

Directions:
In a large pot, combine the pork, jalapeños, 1 teaspoon salt and 7 cups water. Bring to a boil over high, then reduce to low, cover and cook until a skewer inserted into the pork meets no resistance, 60 to 75 minutes.

Using a slotted spoon, transfer the pork to a medium bowl; set aside to cool slightly. Meanwhile, pour the broth through a fine mesh strainer set over a large bowl and let cool.

When the pork is cool enough to handle, shred into bite-size pieces, discarding any fat and gristle. Cover both the broth and shredded meat and refrigerate until ready to use or up to 3 days.


Salsa Fresca
Ingredients:

  • 1 pound ripe tomatoes, cored and finely chopped

  • 3 tablespoons finely chopped red onion

    1/4 cup lightly packed fresh cilantro, chopped

  • 1/2 jalapeno chili, stemmed, seeded and minced

  • 2 teaspoons white vinegar

  • 2 teaspoons extra virgin olive oil

  • Kosher salt

Directions:
In a medium bowl, stir together the tomatoes, onion, cilantro, jalapeño, vinegar, oil and 1 teaspoon salt. Let stand at room temperature for 15 minutes. Using a slotted spoon, transfer the salsa to a serving bowl, leaving behind the liquid. Taste and season with salt.

Sesame-Walnut Manoushe with Zucchini And Yufka Flatbread

My friend Ilana recently let me borrow a cookbook of hers that she thought I would like. Soframiz by Ana Sortun and Maura Kilpatrick. They run a restaurant called Sofra Bakery and Cafe in Cambridge, Massachusetts which Ilana has been to and highly recommends.

The cookbook has a lot of good breakfast and lunch options, as well as a great dessert section. There is a whole section of sandwiches/flatbreads which is definitely what I am drawn too. Most of these are made on a homemade flatbread called Yufka which from what I can tell is very similar to a tortilla (and similar to other homemade tortillas I’ve made). It’s a simple dough of flour, salt, water and olive oil. You do have to let the dough sit for about 4 hours before rolling out but it’s so quick and easy to put together this isn’t a big deal. Mix it all up and let it sit!

IMG_3858.jpeg
IMG_0366.jpeg

Rolling out the dough: with all flatbreads the question is always, how well/easily will the dough roll out? This one wasn’t too bad. It’s 100% white flour which helps, and it’s enriched with olive oil which also helps. After it sat for about 4 hours it was fairly easy to roll out. I shaped the dough into 6 balls. I then went through and did an initial rolling out of the six pieces during which they didn’t roll out very thin, they definitely wanted to spring back as I went. However, I just went through all six pieces and gave them this initial roll, and then I went back around to roll them out again. After this initial roll and short rest they then rolled out very nicely without much problem at all. I cooked them up in a 12 inch cast iron skillet which worked great. I really like how this recipe calls for you to only cook one side of the flatbreads. I’ve never tried that before but I feel like it really helped keep them from drying out which sometimes happens with thin flatbreads. I’ll probably do this with other recipes in the future.

IMG_8222.jpeg

I did not follow the filing recipe exactly as it is written below from the cookbook, but I used it as a loose guide using what I had on hand, not measuring everything. I started with grating about 1/2 an onion and a fairly large zucchini which I squeezed to get rid of excess water before adding to the pan. Towards the end of cooking I added a minced clove of garlic, and two bunches of Tatsoi from my CSA that I needed to use followed by a couple tablespoons of ricotta once it was off the heat. I mixed this all together and then add nice chunks of deliciously creamy French feta and folded in gently to maintain the large pieces. I didn’t have any haloumi so I skipped this, and instead of pomegranate molasses I used balsamic vinegar. I didn’t have any Maras pepper or sesame seeds. As for herbs, I threw in what was on the counter; a little basil, mint and Italian parsley.

The filling turned out wonderfully! It was a fun mix of different things that I eat, but maybe wouldn’t typically put together this way! It was delicious and perfect to fill the flatbreads with. I put down a nice layer of my favorite red pepper sauce to start, and then topped with the filling. I finished with extra feta. Then fold in the dough on both sides and press to hold in place. I then grilled these up on the grill. This was a tiny bit tricky to make sure the filling didn’t all out when I flipped them over (I probably over filled them a bit too) but in the end I was very successful, just had to be careful. You could definitely just bake in the oven for a few minutes, or fry up in a pan as the recipe stated. Just get them heated up and warmed through.

I had the leftovers for lunch the next few days and it was delicious! Definitely not as crispy as day-of, but still wonderful, and easy for a nice lunch! If I was at home would have reheated in either a skillet or the oven and I imagine it would have been just as good as the day they were made!

Sesame-Walnut Manoushe with Zucchini
Ingredients

  • Yufka Dough (recipe below)

  • 2 cups grated zucchini or cousa squash

  • 1/2 teaspoon kosher salt

  • 1 Spanish onion

  • 2 tablespoons plus 2 teaspoons extra-virgin olive oil

  • 1/4 cup cup walnuts, lightly toasted and finely ground in a food processor

  • 1/2 cup grated haloumi cheese

  • 3 to 4 ounces crumbled feta, or 4 ounces buffalo milk mozzarella, broken up into small pices

  • 1 tablespoon pomegranate molasses

  • 3/4 teaspoon Maras pepper

  • 2 tablespoons toasted sesame seeds

  • 2 tablespoons chopped fresh flat-leaf parsley

  • 1/4 cup sliced fresh basil leaves

Directions
Follow the directions to make the yufka dough, transfer to a plastic bag and store at room temperatures. Sprinkle the zucchini with the salt and let stand in a colander or a bowl for 5 minutes to draw out water.

Using the large holes of a box grater, grate the onion over a plate with sides. Place in a strainer and rinse with cold water. Squeeze dry by placing it in the palm of your hand, making a ball and then flattening it as hard as you can to get the water out. Repeat the squeezing with the zucchini. Sweat the zucchini with 2 teaspoons olive oil in a spall saute pan over medium heat until it is barely tender, about 3 minutes.

In a large mixing bowl, combine the onion, zucchini, walnuts, haloumi, feta, pomegranate molasses, Maras pepper, sesame seeds, remaining 2 tablespoons olive oil, parsley and basil. Mix until the filling is spreadable.

When you are ready to assemble, put about 1/3 cup filling on each yufka and smooth it to the edges in a very thin layer. Fold the left side in towards the middles and then the right sides towards the middle, overlapping by about 1/2 inch, to form a rectangle shape with an open top and bottom.

When the manoushe are assembled, heat an 11-to-12 inch cast iron or nonstick pan over medium-low heat. Place two manoushe at a time, seam side down, in the pan. Cook until the filling is hot and the bread is lightly toasted on one side but still soft on the other, 3 to 4 minutes. Flip to the other side and cook 1 minute more to heat through. Place on a tray and cover with aluminum foil to keep warm while you cook the remaining four manoushe. Cut into halves or strips and serve immediately.


Yufka Dough
Ingredients

  • 1 2/3 cup (200 grams) all purpose flour

  • 1 teaspoon kosher salt

  • 2/3 cup (150 grams) warm water

  • 2 tablespoons extra virgin olive oil

Directions
In a medium bowl, whisk together the flour and salt. Make a well in the center and pour in the water and olive oil. Using your fingers, draw the flour in from all sides, working the mixture until it’s sticky and forms into a ball. Turn the dough onto a floured surface and knead until smooth and elastic, about 3 minutes. Transfer back to the bowl, drizzle with a little bit of oil and turn to coat. Cover with plastic wrap and let rest at room temperature for at least 4 hours, or up to overnight.

Divide the dough in half, then divide each half into three equal pieces; you should have six equal pieces, each weighting about 2 ounces of 60 grams.

Roll out each yufka ball into a very thin 8-to-9-inch round, using plenty of flour to keep the dough from sticking to the rolling pin.

Heat an 11-to-12 inch cast-iron or nonstick pan over medium heat and cook the yufka on one side until it starts to bubble up and lightly brown on the bottom, about 2 minutes. You only need to partially cook each flatbread at this stage; don’t get them too crispy or they will be dry and hard to work with. Stack them on top of each other as you cook each one so that they lightly steam and keep each other soft and pliable.

Transfer the warm yufka to a large zip-top plastic bag and store at room temperature up to overnight, or freeze for later use.

Memorial Weekend 2020 (and Chili-Red Pepper Chicken Kebabs [Tavuk Şiş])

IMG_8210.jpeg

It was a bit different of a Memorial Weekend this year. No annual Memorial Day parade. No Monday morning waffle tradition with friends. No big cookout in the afternoon. It was a much quieter and more low key weekend. I really had no plans going into the weekend, but as each day passed they filled up with small gatherings and outings with a few friends and family members. It turned into one of the most lovely and relaxing holiday weekends! And tasty, very tasty…

IMG_8209.jpeg

Friday night I had a friend over to grill out and relax in the back yard. She provided the burgers and wine, while Lara and I provided the grill and the remainder of the food. We grilled up some juicy burgers, topped them with sharp and crumbly Irish Cheddar (one of my favorites!) and garlicky red pepper sauce that is to die for. The sauce was actually made to use on chicken skewers that were on the menu later in the weekend (see below) but it is so good that I doubled the recipe and ate it on pretty much everything this week including these burgers. The juicy meat, sharp cheese, and sweet and garlicky sauce were a perfect combination that I will definitely do again!

We grilled up some asparagus to have on the side which I tossed with a super garlicky Parmesan vinaigrette. My basic go-to of lemon juice and zest, whole grain mustard, salt, garlic and olive oil. This time I added a lot of extra raw garlic, 2 full cloves (if you’re a little nervous about raw garlic then this would not have been for you… but I LOVED it!) as well as a couple of handfuls of grated Parmigiano-Reggiano. The resulting dressing was almost more of a paste at this point. I tossed it together with the hot asparagus straight off the grill and it was so good.

IMG_7989.jpeg

The next day started with a lovely scone and coffee breakfast on the porch. It was the perfect weather for lounging outside for as long as I wanted. Hot coffee, buttery scone, and great company!

Later that afternoon my parents came over for a cook out. We grilled up a new chicken skewer recipe with red pepper paste with homemade Greek yogurt pita, and a fresh green salad. This red pepper paste is the sauce that I was talking about above that we also served with the burgers. Super versatile! It’s apparently a take on a Turkish red pepper paste called biber salçası. This was the first time I’ve heard of this recipe so I know nothing
about it other than that it was delicious!

IMG_8020.jpeg
IMG_8025.jpeg
IMG_8023.jpeg

We ate outside again, enjoying each others company (it had been a long while since I’d seen my dad!), and finally getting the dead branches out of the trees in the backyard. Thanks dad! :)

IMG_8026.jpeg

Finally, on Memorial Day, after another fantastic front porch scones breakfast —> (it was so lovely the day before we had to do it again!) we headed out to a nearby state park that I had never heard of to go kayaking and paddle boarding with friends.

I had never paddle boarded before so I was excited. The lake was lovely, the weather was perfect and the company was great. Since our friends provided the entertainment, Lara and I provided the food.

IMG_8032.jpeg
IMG_8038.jpeg

We thought long and hard (as always!) about what would be best for a picnic after kayaking. We ended up making chicken pesto salad wraps. We grilled up a few boneless skinless chicken breast, cubed it up, and tossed it with plenty of pesto sauce, chunks of fresh mozzarella (similar size to the chicken), and halved cherry tomatoes. It was soooooo good! I’ve made similar things, but never this exact recipe. I loved the soft fresh mozzarella that had marinated in the pesto by the time we ate it. We ate this on more of the homemade Greek yogurt pita. Served with more grilled asparagus, some cold drinks and fruit, it was a perfect picnic!

That was about it for the weekend. Other than one more simple treat, my first iced latte of the summer! What better way to end the weekend!

——————————————————————————————

Chili-Red Pepper Chicken Kebabs (Tavuk Şiş)
Recipe from 177 Milk St
Ingredients

  • 1/2 cup drained roasted red bell peppers, patted dry (I roasted my own and used one full roasted pepper)

  • 6 medium garlic cloves, smashed and peeled

  • 2 fresno chilies, stemmed, seeded and roughly chopped (I wasn’t able to find any fresno chilies so I omitted this and the recipe was still delicious but I would love to make again with the fresnos to see what they add to the mix)

  • 1/4 cup (50 grams) extra virgin olive oil

  • 2 tablespoons dried mint

  • 2 tablespoons aleppo pepper (or 1 tablespoon sweet paprika plus 1/4 teaspoon cayenne pepper) (I used the paprika + cayenne)

  • 1 tablespoon (21 grams) honey

  • 1 tablespoon tomato paste

  • Kosher salt

  • 1 1/2 tablespoons fresh lemon juice

  • 2 lbs boneless, skinless chicken thighs, trimmed and cut crosswise into 1-inch strips (I bought 6 bone-in thighs and boned them myself, this was around 2 lbs)

  • 3 tablespoons chopped fresh mint (I didn’t use, my mint plant isn’t big enough yet!)

Directions
In a food processor (or high-speed blender, I used my Vitamix), combine the roasted red peppers, garlic, chilies, oil, dried mint, Aleppo pepper, honey, tomato paste and 2 teaspoons salt. Process until almost smooth, 45 to 60 seconds, scraping the sides as needed. Measure 3 tablespoons of the puree into a small bowl, then stir in the lemon juice; cover and refrigerate. Transfer the remaining puree to a medium bowl, add the chicken and toss to coat. Cover and refrigerate for at least 1 hour or up to 12 hours.

Prepare a charcoal or gas grill for direct, medium-high heat. For a charcoal grill, ignite a large chimney three-quarters full of coals, let burn until lightly ashed over, then distribute evenly over one side of the grill bed; open the bottom grill vents and the lid vent. For a gas grill, turn all burners to high. Heat the grill, covered, for 5 to 10 minutes; clean and oil the grate. Remove the reserved puree from the refrigerator.

While the grill heats, thread the chicken onto eight 10- to 12-inch metal skewers (I only got 6 skewers out of this, not 8), evenly dividing the pieces and scraping off excess marinade. If using a gas grill, turn all burners to medium-high. Place the skewers on the grill, on the hot side if using charcoal, and cook, uncovered, turning every 2 to 3 minutes, until evenly charred on all sides and the thickest piece is opaque when cut into, 10 to 12 minutes. Transfer to a serving platter. Stir the fresh mint into the reserved puree and serve with the kebabs.

Lahmajoun (or Lahmacun)

IMG_7265.jpeg
IMG_7259.jpeg

I got a new Milk Street magazine this week. This is the second Milk Street magazine I’ve gotten. Lara and I decided that for the coming year, whenever we get one of the magazines we have to make at least 2 or 3 recipes. I starred several recipes for the future, but not surprisingly this recipe for Lahmajoun is the first thing we ended up making! It’s basically a twist on a pizza. From my quick online search, lahmajoun (also spelled lahmacun) is a Turkish or Armenian flatbread typically topped with a minced meat mixture. Another take on pizza? Yes please!

IMG_7261.jpeg

You start with making a yogurt flatbread dough in a food processor. I did change up this recipe a little in order to use up some leftover sourdough starter. (if interested, I used 185 grams of flour, 112 grams of leftover sourdough starter, 3/4 teaspoons instant yeast, 1¾ teaspoons kosher salt, 21 grams honey, and NO additional water since it’s in the sourdough starter).

Let the dough do it’s thing while you make the topping which is a minced meat mixture with roasted red peppers, ground lamb, a little tomato paste and then some smoked paprika and cumin. Easy to blitz up in the food processor. Once everything is ready to go you shape the dough and top with the raw meat mixture. Into a 500 degree oven for 10-12 minutes and it’s done.

The recipe calls for you to drizzle with a little thinned out Greek yogurt which I thought needed a little jazzing up so I added a nice squeeze of fresh lemon juice and lemon zest as well as a hefty dose of sumac, a little salt and a drizzle of olive oil. I highly recommend these additions! I didn’t have any arugula for topping but think that would be a great way to finish it off.

I only made half of the recipe (one of two flatbreads) the first night. The second night I changed it up a bit and topping it with a mix of za-atar and olive oil with a little salt. I did not hold back on the spices and it was great! Then added a bit of goat cheese at the end. A very simple and delicious option!

IMG_7297.jpeg
IMG_7281.jpeg

I think any variation on this recipe would be fun to make for a get-together or party as an appetizer or a little snack. It would be just as good hot, warm, or room temperature. If you want to serve it fresh from the oven it would be easy to have everything ready to go and finish putting it together in just a few minutes whenever you’re ready.

————————————————————————

Lahmajoun (or Lahmacun)
From 177 Milk Street
Ingredients
For the flatbreads:

  • 241 grams (1¾ cups) bread flour, plus more for dusting

  • 1½ teaspoons instant yeast

  • 1¾ teaspoons kosher salt

  • ¾ cup plain whole-milk Greek yogurt (my homemade Greek yogurt weighed in at 180 grams)

  • 1 tablespoon (21 grams) honey

  • ¼ cup (57 grams) water

For the topping:

  • 1 small yellow onion, roughly chopped

  • ¼ cup chopped drained roasted red peppers

  • 2 tablespoons tomato paste

  • 2 teaspoons smoked paprika

  • 1½ teaspoons ground cumin

  • ¾ teaspoon red pepper flakes

  • Kosher salt and ground black pepper

  • 8 ounces ground beef or ground lamb

  • ¼ cup plain whole-milk Greek yogurt

  • Semolina flour, for dusting the pizza peel

  • 2 tablespoons extra-virgin olive oil, divided

  • 2 cups (1 ounce) lightly packed baby arugula

Directions
To make the dough, in a food processor, combine the flour, yeast and salt; process until combined, about 5 seconds. Add the yogurt, honey and ¼ cup water. Process until the mixture forms a ball, about 30 seconds; the dough should be tacky to the touch and should stick slightly to the sides of the bowl. If it feels too dry, add more water, 1 tablespoon at a time, and process until incorporated. Continue to process until the dough is shiny and elastic, about 1 minute.

Transfer the dough to a lightly floured counter. Flour your hands and knead a few times to form a smooth ball. Divide the dough in half and form each half into a taut ball by rolling it against the counter in a circular motion under a cupped hand. Space the balls about 6 inches apart on a lightly floured counter, then cover with plastic wrap. Let rise until doubled in volume, 1 to 1½ hours.

Meanwhile, to make the topping, in a food processor, pulse the onion until finely chopped, about 5 pulses. Add the roasted peppers, tomato paste, paprika, cumin, pepper flakes and 1 teaspoon each salt and black pepper. Process until smooth, about 10 seconds, scraping the bowl as needed. Add the beef and pulse just until incorporated, 3 or 4 pulses. Transfer to a medium bowl. In a small bowl, stir together the yogurt and 1 tablespoon water, adding more water as needed to thin to drizzling consistency. Cover both bowls and refrigerate until needed.

About 1 hour before shaping the dough, heat the oven to 500°F with a baking steel or stone on the upper-middle rack. Working one at a time, gently stretch each dough ball on a lightly floured counter to an oval approximately 6 inches wide and 12 inches long.

Dust a baking peel, inverted baking sheet or rimless cookie sheet with semolina. Transfer one shaped dough to the peel and, if needed, reshape into an oval. Brush the entire surface with 1 tablespoon of oil. Using a spatula, spread half the meat mixture on the dough, leaving a ½-inch border around the edge. Slide the dough onto the the baking steel and bake until well browned, 9 to 12 minutes.

Using the peel, transfer the flatbread to a wire rack. Repeat with the remaining dough, oil and meat mixture. After the second flatbread has cooled on the rack for a couple minutes, top both with the arugula. Drizzle with yogurt, then serve.

Braised Pork Sandwiches with Broccoli Rabe and Provolone

IMG_6997.jpeg

This recipe appeared somewhere in my social media browsing and it look so good, and the timing was right, so Lara and I decided to just go for it! It was a good choice!

The recipe was super simple, as are most roasts/braises, and absolutely delicious, especially with such a great piece of pork from my favorite butcher. Look at the fat on that thing!

Lara made this on a Monday she had off. Throw everything in a pan and let it cook until done. Easy! She had to adjust the cooking method because the original recipe calls for this to be made in the slow cooker, but it was easy enough to adjust for the oven. Just be sure to watch the pork near the end of the braising time to ensure the water hasn’t all evaporated. After 3.5 hours most of the water was gone and the pork was looking very dark, in a good way, but it would have been easy to go a little too far.

I would definitely not skip the broccoli rabe either, it was a great addition, especially with all the lemon - Don’t Skimp on the Lemon!

IMG_1887.jpeg

One recommendation; the recipe calls for you to serve this on a hoagie roll. I didn’t have any but I had plenty of sourdough so I used slices of that instead. This was tasty, but very messy. The pork is so VERY juicy and fatty and so the slices of bread kind of fell apart while eating. A sturdy hoagie or something similar would do a much better job holding up to this type of sandwich.

A great make ahead meal for a crowd.

Braised Pork Sandwiches with Broccoli Rabe and Provolone
Adapted from Bon Appétit
Ingredients

  • 3 pounds boneless, skinless pork shoulder

  • ¼ cup extra-virgin olive oil

  • ¼ cup red wine vinegar

  • 1 head of garlic, halved lengthwise through root end

  • 3 sprigs rosemary

  • 2 tablespoons honey

  • 2 teaspoons fennel seeds

  • 1 teaspoon crushed red pepper flakes

  • 1 tablespoon kosher salt, plus more

Broccoli Rabe and Assembly

  • Kosher salt

  • 2 bunches broccoli rabe, woody ends trimmed

  • ¼ cup extra-virgin olive oil

  • 6 garlic cloves, thinly sliced

  • ½ teaspoon crushed red pepper flakes

  • 4 seeded semolina or hoagie rolls

  • 4 ounces sharp provolone, thinly sliced

  • 1 lemon, cut into wedges

Directions
Pork
Preheat oven to 325 degrees. Combine pork, oil, vinegar, garlic, rosemary, honey, fennel, red pepper flakes, 1 Tbsp. salt, and 1 cup water in a Dutch Oven. Turn pork several times with tongs to coat and mix ingredients. Place lid on the Dutch oven and place in the preheated oven and braise until pork is very tender and shreds easily, about 3 1/2 hours. Keep an eye on the roast in the last hour of cooking to ensure the liquid has not all evaporated. Add more water as needed.

Transfer pork to a medium bowl and let rest until cool enough to handle. Pour cooking liquid through a fine-mesh sieve into a medium saucepan; discard solids. Let liquid settle so fat rises to the top, then pour off and discard all but a thin layer of fat. Bring liquid to a simmer over medium heat and cook, stirring occasionally, until reduced by about a third, 12–18 minutes.

Meanwhile, shred pork with your fingers or 2 forks, discarding any large bits of fat. Season with salt.

Set aside 1 cup cooking juices for serving, then add shredded pork to saucepan with remaining juices and toss to coat and rewarm pork.

Do Ahead: Pork can be cooked 2 days ahead. Shred and add to reduced juices, then let cool, cover, and chill. Reheat over low.

Broccoli Rabe and Assembly
Bring a large pot of salted water to a boil over high heat. Fill a large bowl with ice water and have at the ready. Add broccoli rabe to pot and cook just until stems are tender, about 2 minutes. Using tongs, transfer broccoli rabe to bowl of ice water and agitate to rapidly cool down. Drain and pat dry on paper towels. Transfer to a cutting board and slice into 1" pieces on the diagonal, all the way from stem to leaves.

Heat oil in a large skillet over medium. Cook garlic and red pepper flakes, stirring often, until garlic is golden around the edges, about 2 minutes. Increase heat to medium-high and add broccoli rabe; season with salt. Cook, tossing constantly, until leafy bits are just starting to crisp slightly, 5–10 minutes.

Divide pork among bottoms of rolls or on a piece of toasted bread. Top with provolone, shingling slices. Spoon broccoli rabe over, then squeeze lemon wedges over broccoli rabe. Close up sandwiches and cut in half. Serve with reserved juices for dipping.

Do Ahead: Broccoli rabe can be blanched 1 day ahead. Pat dry, cover, and chill.

Baby Peppers Stuffed with Sausage and Herbs

The first official week of fall was SO HOT this year! We had record highs 5 or 6 days in a row, it was the hottest week of the whole summer, and it wasn't even summer. Kind of ridiculous. It's usually in the low to mid 70s, and we got up to 95 degrees! I'm not complaining. I know it will be cold before I know it, so I tried to enjoy the heat while I could. I decided to enjoy these unseasonable days with a summery stuffed pepper dish full of delicious sausage, in season veggies, and lots of herbs. Enjoyed on the front porch with a glass of Prosecco, it was spot on. And I ended the night with ice cream, obviously!

IMG_1520.jpg

A recipe in one of the cookbooks I recently checked out of the library inspired this dish. I didn't follow the recipe all that closely, but used it as a guide. The original recipe called for chorizo, but my butcher was out, so I went with their verde sausage which is one of my favorites. I don't know exactly what's in it, but it has herbs and a little heat, and is absolutely delicious. It worked out perfectly and these little stuffed peppers were perfect. I will definitely make these little guys again. And really, and sausage would be delicious, chorizo, verde, Italian, choose your own adventure. 

 
IMG_1522.jpg
IMG_1524.jpg
 

Baby Peppers Stuffed with Sausage and Herbs
Adapted from Les Marchés Francais: Four Seasons of French Dishes from the Paris Markets by Brian DeFehr and Pauline Boldt
Ingredients

  • 10-12 mini bell peppers
  • 1/2 medium onion, diced
  • 1/2 jalapeno, diced (optional)
  • 1 clove garlic, minced
  • 4 oil packed anchovies, or about 2 teaspoons anchovy paste
  • 1 small or 1/2 large zucchini, diced
  • 2 Plum tomatoes, chopped
  • Shredded kale (optional)
  • 2 verde sausages (alternatively Italian sausage or Chorizo are good options)
  • Salt
  • 1/2 cup minced fresh parsley

Directions
Preheat oven to 400 degrees. Oil a medium baking dish. Cut the tops off the sweet peppers. With a small knife, dig out the seeds and place the now prepped peppers in the baking dish (slice off a thin slice on the bottom of any of the peppers that want to fall over to create a flat surface). 

Preheat a large skillet over medium heat. Once warm, add a couple of tablespoons olive oil and the add the onions along with a little salt. Cook for 8-10 minutes until softened and starting to brown. Add the jalapeno (if using) and garlic and let cook for 1-2 minutes until the garlic is fragrant. Add the anchovies or anchovy paste,  zucchini, chopped tomatoes and kale (if using; I had a little hanging out in my garden and so just threw it in, but it's not needed). If the skillet is looking too dry, add a little bit of water. Let cook for a couple of minutes until everything is getting nice and wilty. Add more salt to taste. 

Remove the casing from the sausages and crumble into the pan with the onion and zucchini mixture. Cook until the sausage is just about cooked through. Remove from heat and add the minced parsley and stir everything together. (At this point you can add a little bit of shreded of diced cheese; I had a small piece of Manchego floating around the fridge that was perfect for this, but you can just skip it too). 

Use a teaspoon to stuff the mixture into the prepared sweet peppers. Place in preheated oven and bake for 25-30 minutes, until the peppers are fully softened. Remove from oven and top with shredded parmesan cheese if desired. Let cool. Serve warm or at room temperature.