Blubarb Snack Cake

IMG_7883.jpeg

I seem to have a theme going. Loaf cakes with lemon. Probably because I love them so much, and they seem perfect in the spring. I’d eyed this particular recipe before and decided to make it yesterday, a dreary and rainy Sunday. It literally rained all day with hardly any breaks. That rarely happens. I think my newly planted garden loved it, but I hope it doesn’t just keep going and flood out the plants!

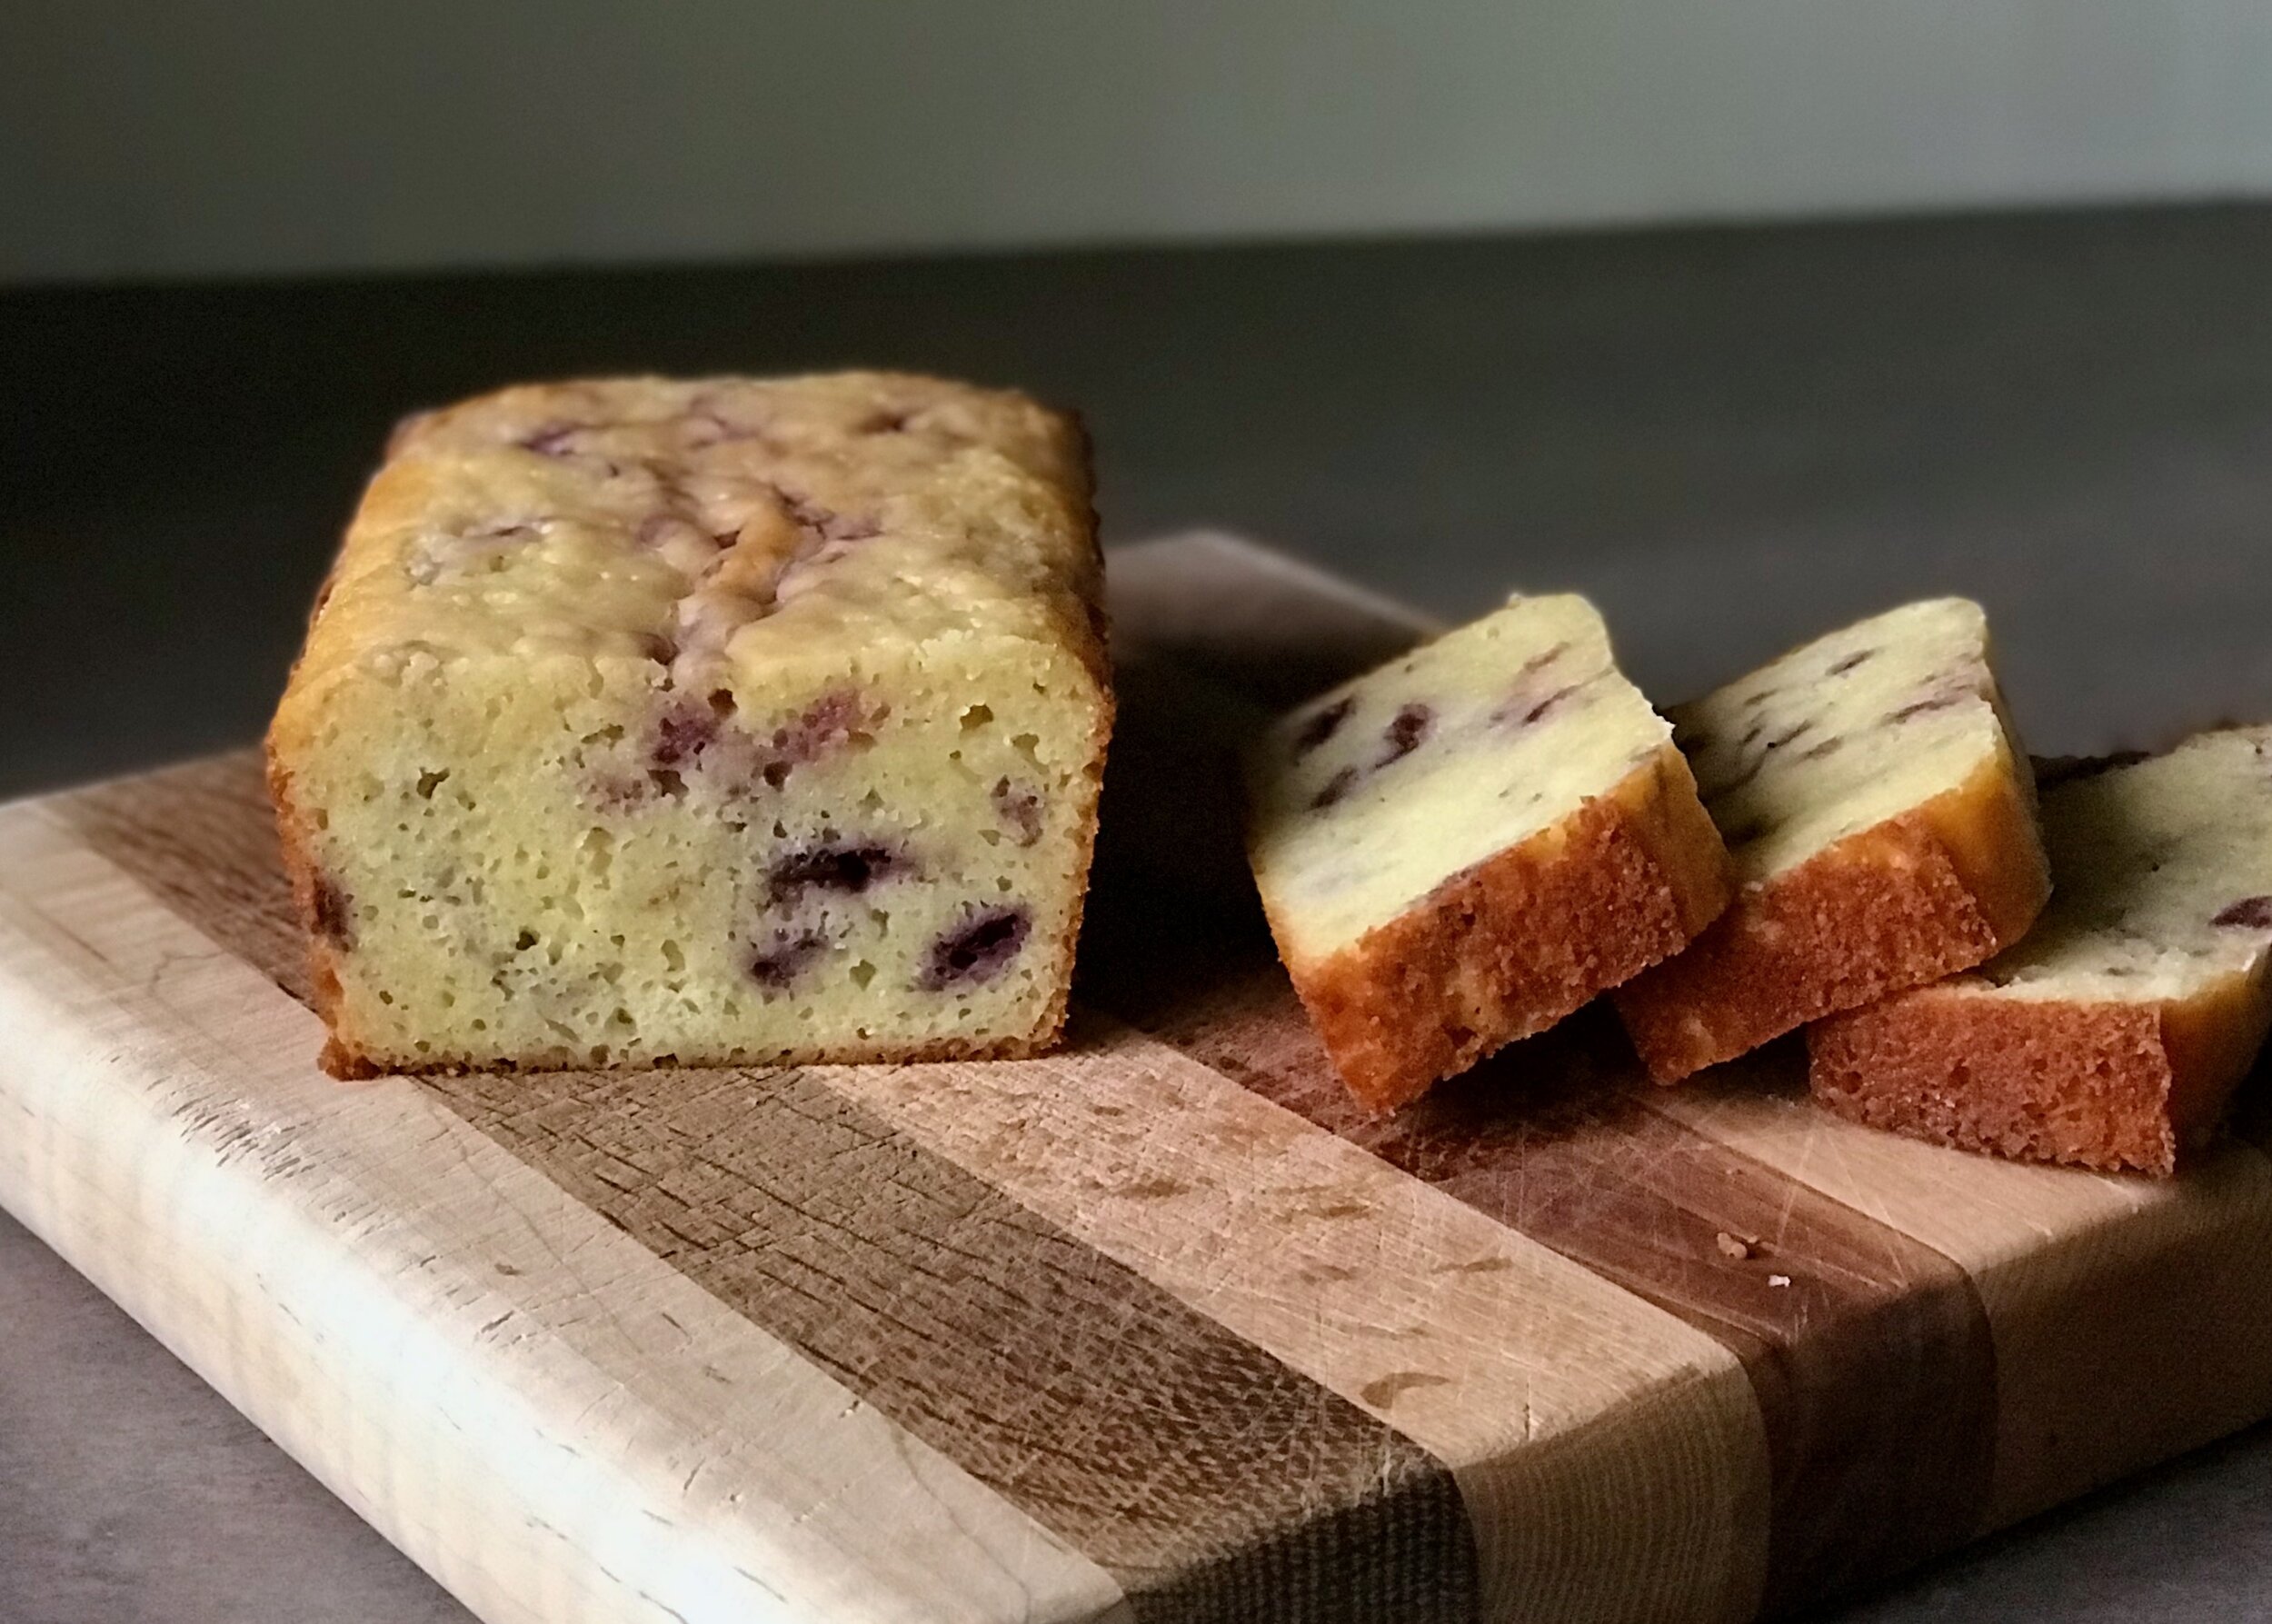
I got the recipe off of Food52, but it’s originally from Yotam Ottolenghi’s cookbook, Sweet: Desserts from London's Ottolenghi. My neighbor had dropped off a few stalks of rhubarb that I wanted to do something with so I cooked it down into a quick tart rhubarb and. blueberry (aka “blubarb”) jam and swirled it into the cake. (my “jam” was 4-5 stalks of rhubarb, 4 handfuls of frozen blueberries, and 1/4 cup of sugar. Not super sweet at all. I wanted it just sweet enough to be tasty but still nice and tart and not overwhelmingly sweet. This worked out well,) This jam replaced the poppyseeds and a lot of the lemon zest, although I still used zest from probably 1/2 a lemon or so.

Other little tweaks: It called for sour cream which I don’t usually have so I substituted with my homemade Greek yogurt which is nice and thick and rich. I cut back slightly on the sugar and used 200 grams (1 cup) instead of the 225 called for. Also, my lemon wasn’t super juicy so I made 3/4 of the glaze which worked out fine.

IMG_7898.jpeg

As I transferred the cake to the pan I dropped in spoonfuls of the blubarb jam and swirled it in with a toothpick. Into the oven it went. The recipe specifically states to not open the door of the oven for the first 45 minutes which is killer for me but I did it! Mine ended up baking for exactly 55 minutes which seemed just right.

Overall I think it’s a pretty cake, but I was hoping it would baked up taller and more domed. The crumb of my cake also looked nothing like the picture on the website. It was much spongier and wet looking, not fluffy and cake-like. Now, I know sometimes cakes made with yogurt can look like this so that may be my problem since I basically replaced cream with milk (sour cream vs yogurt) which are very different things. I may have to attempt this recipe again the next time I happen to have some sour cream just to see how big of a different it makes. I do love the lemon glaze on top and will do that for other cakes too.

The flavor is very nice. A good amount of lemon, obvious but not overwhelming. I like the swirl of jam but would do more next time. I like to eat mine with a dollop of plain yogurt on top. The combination of sweet cake with tart and creamy yogurt is the best!

———————————————————————————————————————————————————————————————

Blubarb Jam Snack Cake
Adapted from Food52
Ingredients

  • 3 large eggs

  • 1 cup plus 2 tablespoons (225 grams) granulated sugar [I only used 1 cup/200 grams]

  • 1/2 cup (120 grams) sour cream [I substituted with Greek yogurt, same weight]

  • 5 tablespoons (70 grams) unsalted butter, cubed, plus extra for greasing

  • 1 tablespoon poppy seeds Finely grated zest of 3 lemons (1 tablespoon) [I omitted the poppy seeds and used less lemon zest]

  • 1 1/3 cups (170 grams) all-purpose flour

  • 1 1/4 teaspoons baking powder

  • 1/4 teaspoon salt 3/4 cup (90 grams) confectioners' sugar, sifted

  • 2 tablespoons lemon juice

Directions
Heat the oven to 325° F. Grease a 8 1/2 x 4 1/2-inch loaf pan and line with parchment paper, then set aside.

In a small saucepan over low heat melt the butter. Stir in the poppy seeds and lemon zest and set aside to cool. Sift the flour, baking powder, and salt together into a bowl, set aside.

Place the eggs and granulated sugar in the bowl of an electric mixer with the whisk attachment in place and whisk on medium-high speed for about 2 minutes, until pale and frothy. Add the sour cream and continue to beat for about 2 minutes, until the mixture has combined.

Use a rubber spatula to fold the flour mixture into the egg mixture until mostly combined. Then fold in the butter mixture until everything is just combined, don’t overmix. Spoon the mixture into the loaf pan. Bake for 55 to 65 minutes, or until a skewer inserted into the center comes out clean [Mine took 55 minutes and seemed perfectly cooked]. Do not open the oven door to check the cake during the first 45 minutes of baking.

While the cake bakes make the glaze: Whisk the confectioners' sugar with the lemon juice in a bowl. Pour the glaze over the top of the cake as soon as it comes out of the oven, spreading it over the top so that it sinks in and creates a nice coating. Set aside to cool for 30 minutes before removing from the pan. Leave to come to room temperature before serving.

Lentil Salad with Tomatoes and Gorgonzola

It's finally spring here in Michigan. Yesterday was lovely, and today is looking like it's going to be even better. Unfortunately I'm working this weekend, but hopefully I'll get out in time to enjoy a little of the beautiful sunshine. During the winter and early spring, before any spring produce has hit the farmer's market, my quick meal repertoire is full of grains, legumes and roasted veggies. I never get tired of any combination of these things. There are endless possibilities, different combinations of these various components as well as different spices, sauces, and other add-ins. It's really almost impossible to go wrong. Some might turn out a little better than others, but I'm always happy with the end result.

I usually just find myself throwing a bunch of things together depending on what's in my fridge at the moment. For this recipe however, I actually did follow a recipe from the cookbook Plenty by Yotam Ottolenghi with just a few minor adaptations. I love his recipes and so wanted to actually follow one of them fairly closely to see his magic at work. I find that when I just do my own thing I can get stuck in a rut of the same flavor combinations, or at least very similar combinations of ingredients. Deferring to someone else from time to time can help inspire me to try out something new.

I kept this recipe pretty true to the original. I didn't have chives so used green onion instead. Added a bit of lemon zest at the very end to perk things up a bit, add a little brightness. I also used pomegranate vinegar instead of balsamic vinegar because I don't have any balsamic right now. This is a light and fresh salad; delicious, simple, healthy. Really exactly what I love. The sweetness of the tomatoes pairs perfectly with the creamy Gorgonzola and sharpness of the red onion. All the herbs really amp up the flavor adding even more freshness.

There are endless variations are possible on this basic theme. I would keep the tomatoes, onions and obviously the lentils, but could change up the cheese to anything nice and creamy, and can swap out the herbs for your favorite herb or whatever you have on hand. Add some spices, sauce, more roasted veggies. To really make it a filling meal you could add some chicken, or tofu on top depending on your preference. It could all go on top of a bed of greens as well to bulk it up and turn into more of a green salad. All wonderful, and I'm sure delicious, ideas.


Lentil Salad with Tomatoes and Gorgonzola
Adapted from Plenty by Yotam Ottolenghi
Ingredients
Oven-dried tomatoes:

  • 3 plum tomatoes
  • 4 sprigs of thyme
  • 1 1/2 teaspoons olive oil
  • 1 tablespoon pomegranate or balsamic vinegar
  • salt

Salad:

  • 1/2 small red onion, very thinly sliced
  • 1 1/2 teaspoons red wine vinegar
  • 1/2 teaspoon salt
  • 2/3 cup (120 grams) French lentils
  • 1 1/2 tablespoons olive oil
  • 1 small garlic clove, crush
  • black pepper
  • 1 1/2 tablespoons chopped parsley
  • 1 1/2 tablespoons chopped green onion
  • 2 tablespoons chopped dill
  • 1 1/2 ounces Gorgonzola, crumbled
  • lemon zest (optional)

Directions
To make the oven-dried tomatoes. Preheat the oven to 275 degrees. Quarter the tomatoes vertically and place skin-side down on a baking sheet lined with parchment paper or aluminum foil. Arrange the thyme sprigs on top of them. Drizzle over the olive oil and balsamic vinegar and sprinkle with some salt. Roast for 1 1/2 hours, or until semi-dried. Discard the thyme and allow to cool slightly. 

Meanwhile, place the red onion in a medium bowl, pour over the vinegar and sprinkle with the sea salt. Stir, then leave for a few minutes so the onion softens a big. 

Place the lentils in a pan of boiling water (the water should come 1 1/4 inches above the lentils) and cook for 20-30 minutes, or until tender. Drain well in a sieve and, while still warm, add to the sliced onion. Also add the olive oi, garlic and some black pepper. Stir to mix and leave aside to cool down. Once cool, add the herbs and gently mix together. Taste and adjust seasoning. 

To serve, pile up the lentils on a large plate or bowl, integrating the Gorgonzola and tomatoes as you build up the pile. Drizzle the tomato cooking juices on top and serve. 
 

Sweet Corn Cakes with Tarragon and Cheese

Last week at the farmer's market I bought the last of the season's sweet corn. It was a bittersweet day, sweet corn season is one of my absolute favorites. But what to do with these last precious ears of corn? I decided that instead of grilling them up and throwing into my weekly meal prep that I would try something different and bake with them. I had seen this recipe for sweet corn cakes in the Ottolenghi cookbook Nopi a while back and thought they sounded so yummy, but would really want to use fresh, in season sweet corn to try it out. Well, this was my last chance so I dove right in. 

I only bought a couple ears of corn so had to make half the recipe, but that works out okay for me since I'm the only one at home. I did end up altering the spices and flavoring a little bit based on my preferences and what I had at home. I have no doubt the recipe as written is amazing, but my little changes worked well for me and I thought the end product turned out amazing! The smell of these little cakes baking was absolutely wonderful, cheesy, buttery and herb-y! A fitting end to the sweet corn season for another year.  

Since I made these to eat for breakfast instead of as a side to a meal I decided to use a little less onion and garlic. And while I did alter some of the spices I think that the tarragon is a must! A unique but wonderful flavor. Sadly I didn't have any feta which would have been amazing, but did have some local raclette style cheese from the farmer's market that I knew would be delicious so used that instead. Thanks to Hickory Knoll Farm for the wonderful cheese; it was perfect! Cheesy, sweet, savory and incredibly tender. The texture is very moist and almost souffle-like. For something a little different than the traditional corn muffin, give these little corn cakes a try and be ready to be amazed! This is really truly "corn bread". 


Sweet Corn Cakes with Tarragon and Cheese
Adapted from Nopi by Yotam Ottolenghi
Ingredients

  • 2 ears corn
  • 1 tablespoon minced red onion
  • 1/2 small clove garlic
  • 1/4-1/2 teaspoon fennel seed
  • 1/8 teaspoon ground cumin
  • 1/8 teaspoon ground sumac
  • 1/8 teaspoon ground coriander
  • Fresh tarragon
  • 1/2 teaspoon baking powder
  • 2 1/2 tablespoons (1 1/4 ounces) melted butter
  • 3/4 teaspoon salt
  • Black pepper
  • 1 egg, separated
  • 1 tablespoon whole wheat flour
  • Raclette, feta or another favorite cheese

Directions
Preheat the oven to 400 degrees. Grease the 6 muffin tins very well with butter and line with squares of baking parchment, buttering the parchment as well. 

Lay the corn cobs flat on a cutting board and use a large sharp knife to shave off the kernels – you should have about 250 grams total (I used 2 large ears and I had quite a bit more than 250 grams, I only ended up using about 3/4 of the kernels). 

Discard the cob and transfer the kernels to a food processor, along with the onion and garlic. Pulse for 3–4 seconds, until the mixture is roughly processed but has not turned to a wet purée

Add the fennel seeds, cumin, coriander, sumac, tarragon, baking powder, butter and egg yolk, along with 1 1/2 teaspoons of salt and a very good grind of black pepper. Blitz a few more times, to combine – some of the corn kernels will still be whole – then transfer to a medium bowl. Fold the flour in by hand and set aside

Place the egg white in a separate small bowl and whisk to form firm peaks. Fold a third of the whites gently into the corn mixture. Once it has incorporated, continue with the next third and then the next

Once fully incorporated, divide the mixture between the muffin tin and insert a chunk of cheese into the center of each. Push it halfway down the corn mixture – the cakes will puff up around the cheese when they cook

Bake for 25–30 minutes, until the cakes have risen and are golden and fluffy. Remove from the oven and set aside for 10 minutes before lifting them out of the tray

Asparagus Vichyssoise

When the asparagus starts showing up at the farmer's market every year I know I have made it. Spring has (un)officially arrived and warmer weather is on the way. Now it's the middle of June and I've been buying asparagus almost every week at the farmer's market. It's been great!! This past week I decided to try something new with my asparagus, something I've never done before - making a vichyssoise. Of course I was familiar with the name vichyssoise, and I had a vague sense of what this soup was, but until this past week I couldn't have really defined it exactly. Well now I know!

I was excited to try this asparagus vichyssoise first of all because I love asparagus, and second of all because it gave me another opportunity to use my new favorite kitchen toy, a new Vitamix blender! I used some graduation money to splurge on a Vitamix a few weeks ago and have been loving it! It was the perfect tool to make this smooth and creamy soup. So, what I now know about vichyssoise is that it is traditionally a creamy potato leek leak soup that is eaten cold. This was basically that with the wonderful addition of asparagus. There is just a tiny bit of cream and a little Greek yogurt to help make it really nice and creamy with just a bit of tang from the yogurt. A wonderfully healthy and light soup for a hot spring day. 

This is a very simple recipe that does not require a lot of hands on time. All you really need to do is cut up a few veggies, throw them in a pot with some stock and let them cook for a good 40-50 minutes. Then blend away until very smooth with some cream and yogurt and move to the fridge to get nice and chilled. You can garnish with some extra shaved asparagus or a little dollop of cream or yogurt, or a drizzle of olive oil, whatever sounds good to you. I have no doubt you will enjoy this delicious and refreshing spring soup.  


Asparagus Vichyssoise
Adapted from Plenty by Yotam Ottolenghi
Ingredients

  • 1 leek
  • 1/2 pound asparagus
  • 1 small potato, peeled and diced
  • 1 1/2 tablespoons
  • 1 1/2 cups vegetable stock
  • 1/2 teaspoon sugar
  • 1 1/2 tablespoons cream
  • 3 tablespoons Greek yogurt
  • 40g samphire
  • Grated zest of ½ lemon

Directions
Peel the potato and dice roughly. Chop off and discard the tough green ends of the leeks. Cut through the pale center, then wash well and slice roughly. Trim off and discard the woody base of the asparagus. Cut all but two of the spears into 3/4-inch pieces, keeping the tips separate. Reserve whole spears.

Place the vegetables, except for the asparagus tips and reserved whole spears, with the butter in a medium saucepan and sauté on medium heat for about 4 minutes; make sure they don’t take on any color. Cover the vegetables with the stock and add the sugar and some salt and white pepper. Bring to a boil, then simmer, covered, for 40 minutes. At the end of this time add the asparagus tips and continue cooking for 10 minutes.

Once done, blitz the soup well in a blender until very smooth. Gently fold in the cream and half the yogurt. Allow the soup to come to room temperature, then chill.

While the soup is cooling down, bring a pan of water to the boil and blanch the reserved asparagus for 2 minutes; drain and refresh under plenty of cold water. Shred.

Pour the chilled soup into bowls and serve with a dollop of yogurt swirled in and topped with the shredded asparagus and lemon zest if desired. 

Classic Hummus

I've been wanting to do a post on hummus for a long time now, but whenever I would make it I never ended up taking any pictures. Well, recently I decided that enough was enough, it was time for hummus pics. So here you are, my favorite, go-to hummus recipe from my favorite cookbook author and chef, Yotam Ottolenghi. To be honest, this is the only hummus recipe I've ever made, but I love it so much that I've never felt the need to search for another. It turns out super creamy, lemony hummus, full of garlic and tahini.

Homemade hummus is so incredibly good, and really quite easy. You will never want to go back to the watery, flavorless store-bought hummus again once you've tried making it yourself (even though, if in a pinch, the store-bought version makes an appearance, don't worry, I understand, sometimes convenience trumps all!). But seriously, this stuff is so good. If you've never tried making hummus before you really should give it a shot. Pull out that food processor and grab a bag of dried chickpeas and get going!

This recipe comes from Jerusalem by Yotam Ottolenghi which I've talked about before, so I won't wax poetic about this wonderful book again. The original recipe makes a massive batch of hummus, way more than I ever need for myself, so I usually halve it. You'll see the halved recipe below, so go ahead and double it if you need a big batch, just be sure you're food processor is big enough. As written below, the recipe makes approximately 2 1/4 - 2 1/2 cups of hummus in the end, so still a nice amount of hummus. 

Making hummus is really a simple process. You do have to think ahead in order to have time to soak and cook the chickpeas, but once that is done, the food processor takes care of all the hard work. And while I know you can make hummus with canned chickpeas, I highly recommend dried. They taste so much better, are not really any more work, and are cheaper, win-win! 


Classic Hummus
Adapted from Jerusalem by Yotam Ottolenghi and Sami Tamimi
Ingredients

  • 1/2 cup plus 2 tablespoons (125 grams) dried chickpeas
  • 1/2 teaspoon baking soda
  • 3 1/4 cups water
  • 1/2 cup plus 1 tablespoon (135 grams) tahini
  • 2 tablespoons freshly squeezed lemon juice (do not use bottled lemon juice)
  • 2 cloves garlic, crushed
  • 3 1/2 tablespoons ice-cold water
  • salt

Directions
The night before making the hummus, put the chickpeas in a medium-to-large saucepan and cover them with cold water at least twice their volume. Leave to soak overnight.

The next day, drain the chickpeas and return to the saucepan. Place the saucepan over high heat and add the baking soda. Cook for about 3 minutes, stirring constantly. Add the water and bring to a boil. Cook, scimming off any foam and any skins that float to the surface. The chickpeas will need to cook between 20 and 40 minutes, depending on how fresh they are, sometimes even longer. Once done, they should be very tender, breaking up easily when pressed between your thumb and finger, almost but not quite mushy. 

Drain the chickpeas. You should have roughly 1 3/4 cup (300 grams) now. Place the chickpeas in a food processor and process until you get a stiff paste. Then, with the machine still running, add the tahini, lemon juice, garlic and 3/4 teaspoon salt. Finally, slowly drizzle in the iced water and allow it to mix for about 5 minutes, until you get a very smooth and creamy paste. 

Transfer hummus (which will be quite warm at this point) to a bowl, cover the surface with plastic wrap, and let it rest for at least 30 minutes. If not using right away, refrigerate until needed. Make sure to take it out of the fridge at least 30 minutes before serving. 

Roasted Chicken with Clementines and Fennel

For Easter last week, my sister Lara and I decided to break from tradition and try something new. Instead of serving ham or lamb with potatoes and a basic vegetable, we chose to go with an Israeli inspired feast. I mentioned previously that this past Christmas my sister-in-law gave me the cookbook Jerusalem by Yotam Ottolenghi and Sami Tamimi. Now that I've made a handful of recipes from this book I can say with confidence that it is a great cookbook, I love it. Everything I've made has been absolutely fantastic. 

We decided on the recipe for Roasted Chicken with Clementines and Arak for our main dish. The photo in the cookbook was mouth watering, and the ingredients didn't look too exotic so I thought it wouldn't be too scary for the less adventurous eaters in my family.  The end result was outstanding, the flavors of fennel and clementine shined through in perfect balance in this beautiful and colorful dish. 

This recipe really couldn't be simpler. Mix together a few simple ingredients and let marinate in the fridge overnight. The next day the work is minimal. Just throw it all in a big roasting pan and stick it in the oven. That's it. So easy and so good. 

Once it comes out of the oven pour all the cooking liquid into a pan and reduce to make a nice flavorful sauce. Pour it over the cooked chicken and serve! You won't be disappointed. 

And here's the entire feast. I thought it was an absolutely fantastic meal. Along with the chicken the rest of the menu included: 

Fresh homemade pita
Homemade hummus
Spinach salad with prunes and almonds
Yogurt pasta salad with basil, pine nuts and feta
Simple rice pilaf
Clementine and almond syrup cake

Roasted Chicken with Clementines and Fennel
Slightly adapted from Jerusalem by Yottam Ottolenchi and Sami Tamimi
Ingredients

  • 6 1/2 tablespoons dry white wine (or Arak, Ouzo or Pernod if you have it, I didn't)
  • 1/4 cup olive oil
  • 3 tablespoons freshly squeezed orange juice
  • 3 tablespoons freshly squeezed lemon juice
  • 2 tablespoons grainy mustard
  • 3 tablespoons light brown sugar or honey
  • 2 1/2 teaspoons salt
  • 1 1/2 teaspoons black pepper
  • 1 medium fennel bulb, cut into chunks
  • 1 or 2 medium onions cut into chunks
  • 3 pounds bone-in, skin-on chicken pieces (I used thighs and legs)
  • 4 clementines (14 oz), unpeeled, sliced thin
  • a few sprigs of thyme
  • 1-2 teaspoons fennel seeds, lightly crushed 
  • Chopped flat-leaf parsley, to garnish

Directions
In a large mixing bowl whisk together the wine, olive oil, orange juice, lemon juice mustard, sugar, salt and pepper. Add the fennel, onion, chicken, clementines, thyme and fennel seeds. Stir well with your hands, then leave to marinate in the fridge for a few hours or overnight (you can also skip the marinating step if you are pressed for time).

When ready to roast, preheat the oven to 475 degrees. Transfer the chicken and its marinade to a baking sheet large enough to accommodate everything in a single layer. Place the chicken skin side up. Roast the chicken for 35 to 45 minutes, until colored and cooked through. 

Life the chicken, fennel and clementines from the pan and arrange on a serving plate; cover and keep warm. Pour the cooking liquid into a small saucepan, place over medium-high heat, bring to a boil, then simmer until the sauce is reduced by one third, so you are left with about 1/3 cup. Pour the hot sauce over the chicken, garnish with parsley and serve. 

Meatballs with Edamame and Lemon

Going to the library is one of my all time favorite things to do. I love to read, and am in the middle of some novel or memoir at all times. When arriving at the library, I have a pretty set routine; I start by heading over to the new books section to check out what new fiction has come in since my last visit, then I shift over to the non-fiction, usually looking for a memoir that might catch my eye, and last but not least I check out the new cookbooks to see if I can be inspired by something new.

A few weeks ago I picked up a new cookbook called Jerusalem by Yotam Ottolenghi and Sami Tamimi, it was just too pretty to ignore. I'll admit, I'm usually more drawn to the baking cookbooks, but for whatever reason this one intrigued me and I started flipping through it. It's a beautiful cookbook filled with mouthwatering recipes from the authors' hometown of Jerusalem. I decided I had to take it home with me in order to try something I had never had before.

It took me a while to decide which fabulous looking recipe to try, but I finally settled on this meatball recipe. It sounded hearty and fresh and perfect for a spring dinner. To make a long story short, it turned out fantastically, absolutely delicious and filled with new and intriguing flavor combinations. It was the perfect choice, and made me want to make everything else in the book too.

I only got a couple of so-so pictures of the final dish, but I think you can at least get some idea of how it turned out. It may just look like a pot of meatballs, but the textures and flavors were so new to me and made my tastebuds sing. The only real changes I made were substituting edamame for the fava beans. I searched the grocery store long and hard for fava beans and couldn't find a one, fresh or frozen. I settled for a bag of frozen edamame which I unshelled before using. It seemed to be a very good substitute, even thought I have no real idea of what fava beans are like.

I also had to make my own baharat spice blend since my grocery store doesn't carry that, and the recipe in the book was too intense for my spice cupboard, using whole cinnamon sticks and cumin and coriander seeds, stuff I don't have. Googling 'baharat spice blend' gave me many options which I tweaked to work for me. The resulting mixture is below. It seemed to work well, even though I'm sure using the recipe in the book would have been even more flavorful.

Other than that I followed the recipe to a T and ended up with a restaurant quality meal if I do say so myself. The recipe does have a long list of ingredients, and it did take me quite a while to put together but I think it was totally worth it. So if you are feeling like tackling something a little different, and are willing to spend some time on it, I suggest trying out this simply delicious recipe ASAP.

Meatballs with Edamame and Lemon

Slightly adapted from

Jerusalem

by Yotam Ottolenghi and Sami Tamimi

Ingredients

  • 4 1/2 tablespoons olive oil
  • 2 1/3 cups (350 grams) edamame beans (or fava beans, if you can get them, fresh or frozen)
  • 4 whole thyme sprigs
  • 6 cloves garlic, sliced
  • 8 green onions, cut at an angel into 3/4 inch segments
  • 2 1/2 tablespoons freshly squeezed lemon juice
  • 2 cups chicken stock
  • salt and pepper
  • 1 1/2 teaspoons each chopped flat leaf parsley, mint, dill, and cilantro, to finish

Meatballs

  • 10 ounces ground beef
  • 5 ounces ground lamb
  • 1 medium onion, finely chopped
  • scant 1 cup/120 grams bread crumbs
  • 2 tablespoons each chopped flat leaf parsley, mint, dill, and cilantro
  • 2 large cloves garlic, crushed
  • 4 teaspoons baharat spice mix (bought, or see recipe below)
  • 4 teaspoons ground cumin
  • 2 teaspoons capers, chopped
  • 1 egg, beaten

Directions

Place all of the meatball ingredients in a large bowl. Add 3/4 teaspoons salt and plenty of pepper and mix well with your hands. Form the mixture into meatballs approximately the size of a ping pong ball. Heat 1 tablespoon of oil over medium heat in a large pan for which you have a lid (I used my Dutch oven). Sear half of the meatballs until brown all over, about 5 minutes. Remove from pan, add an additional 1 1/2 teaspoons of oil and brown the remaining meatballs. Remove from pan and wipe clean.

(If using fresh fava beans, throw them into a pot of salted, boiling water and blanch for 2 minutes. Drain and refresh under cold water. Remove the skins from half of the fava beans and discard)

Heat 3 tablespoons of oil over medium heat in the same pan as before. Add the thyme, garlic and green onion and sauté for 3 minutes. Add 1 1/2 tablespoons of lemon juice, 1/3 cup of stock, 1/4 teaspoon salt, plenty of black pepper and the edamame beans (or the

unpeeled

 fava beans, if using). The beans should be almost covered with liquid. COver the pan and cook over low heat for 10 minutes.

Return meatballs to pan. Add the remaining stock, cover the pan and simmer gently for 25 minutes. Taste and adjust seasoning. If still quite runny, remove lid and reduce a little. The meatballs will absorb a lot of juice, so make sure there is still plenty of sauce. (At this point you can remove the meatballs from the heat and hold until ready to serve. When ready to serve, add a little water, if necessary, to get enough sauce, and continue as below.)

Just before serving, add the remaining herbs, the remaining 1 tablespoon of lemon juice (and the peeled fava beans, if using) and stir gently. Serve immediately.

Baharat Spice Blend

Ingredients

  • 1 1/2 teaspoon pepper
  • 3/4 teaspoon coriander
  • 3/4 teaspoon cinnamon
  • 3/4 teaspoon cloves
  • 1/2 teaspoon cumin
  • 1/8 teaspoon cardamom 
  • 1/2 teaspoon nutmeg
  • 1 1/2 teaspoon paprika

Directions

Blend all spices together in a small bowl, then use in your favorites dishes.